Update, March 3: Version 3.1.1 of Apple Frames has been released with support for a new passthrough output command. This post has been updated to reflect the changes. You can redownload the updated shortcut at the end of this post.
Today, I’m happy to introduce something I’ve been working on for the past couple of months: Apple Frames – my shortcut to put screenshots captured on Apple devices inside physical device frames – is getting a major upgrade to version 3.1 today. In addition to offering support for more devices that I missed in version 3.0 as well as some bug fixes, Apple Frames 3.1 brings a brand new API that lets you automate and extend the Apple Frames shortcut itself.
By making Apple Frames scriptable, I wanted to allow power users – such as designers and developers who rely on this shortcut to frame hundreds of images each week – to save valuable time without compromising the accessible nature of Apple Frames for other people. This is why all of the new advanced features of Apple Frames are optional and hidden until you go look for them specifically. Furthermore, even if you do want to use the Apple Frames API, you’ll see that I designed it in the spirit of Shortcuts: it does not require any code and it’s entirely powered by simple, visual ‘Text’ actions.
I’m incredibly excited about what Apple Frames can do in version 3.1, so let’s dive in.
Installation and Update
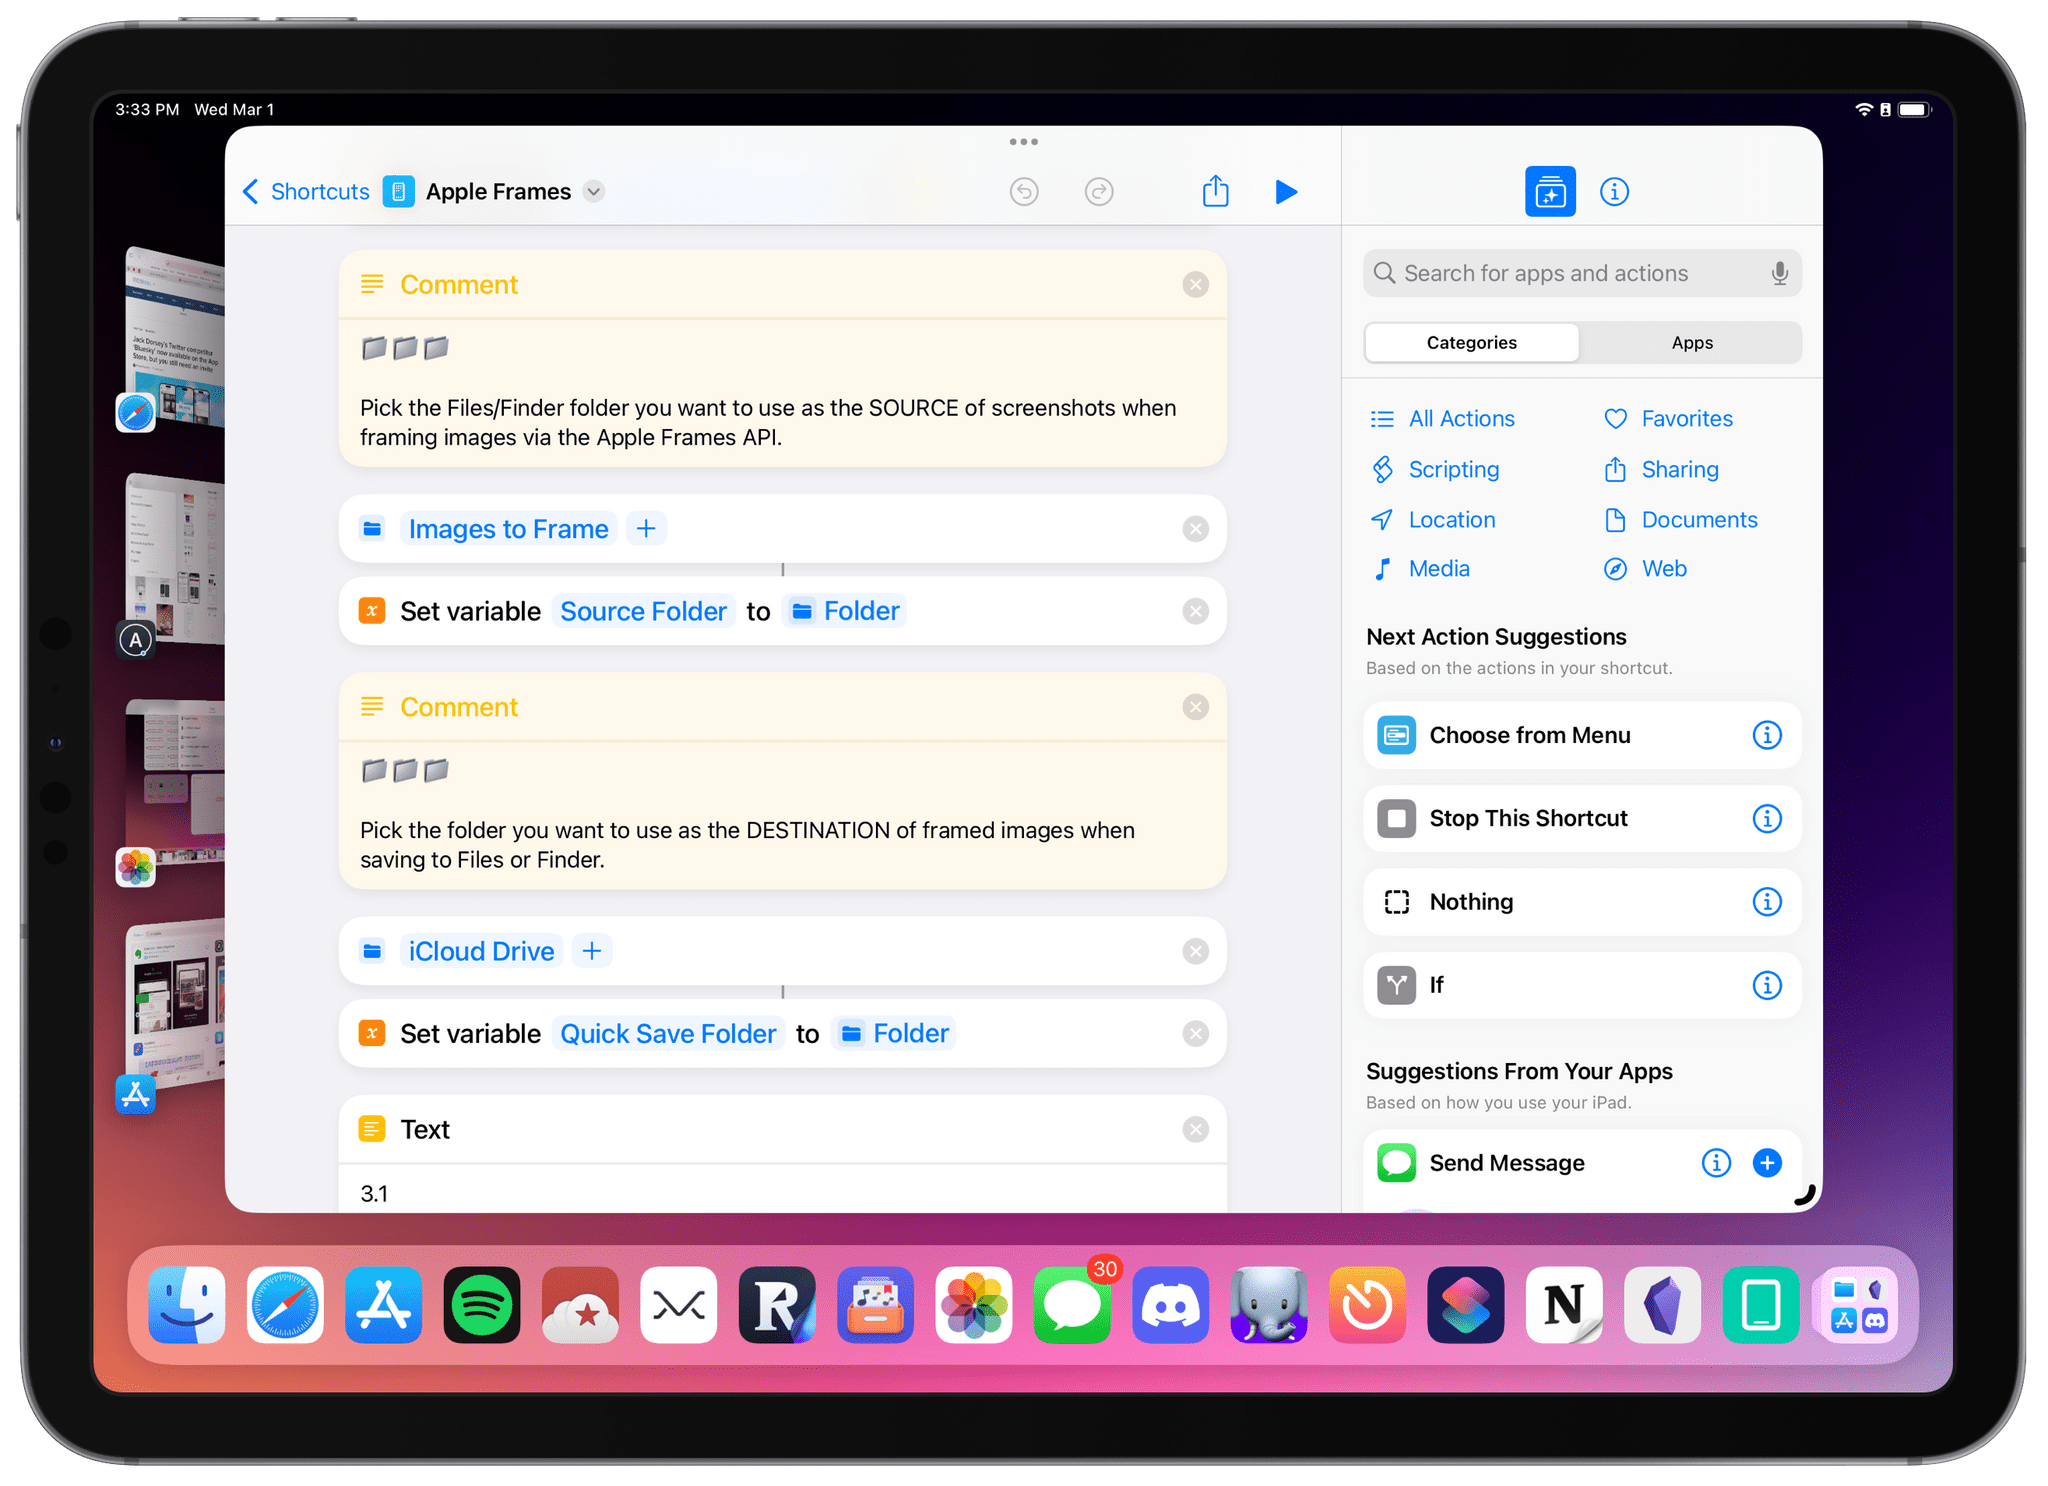
To download Apple Frames 3.1, you can click the download link at the end of this article or find it in the MacStories Shortcuts Archive. If you already have an older version of Apple Frames installed, you will be prompted to replace it while setting up the shortcut. As with version 3.0, during setup you’ll be asked to pick a folder in iCloud Drive that will serve as the destination folder for the ‘Quick Save’ functionality; in version 3.1, you’ll be asked to pick a source folder too.
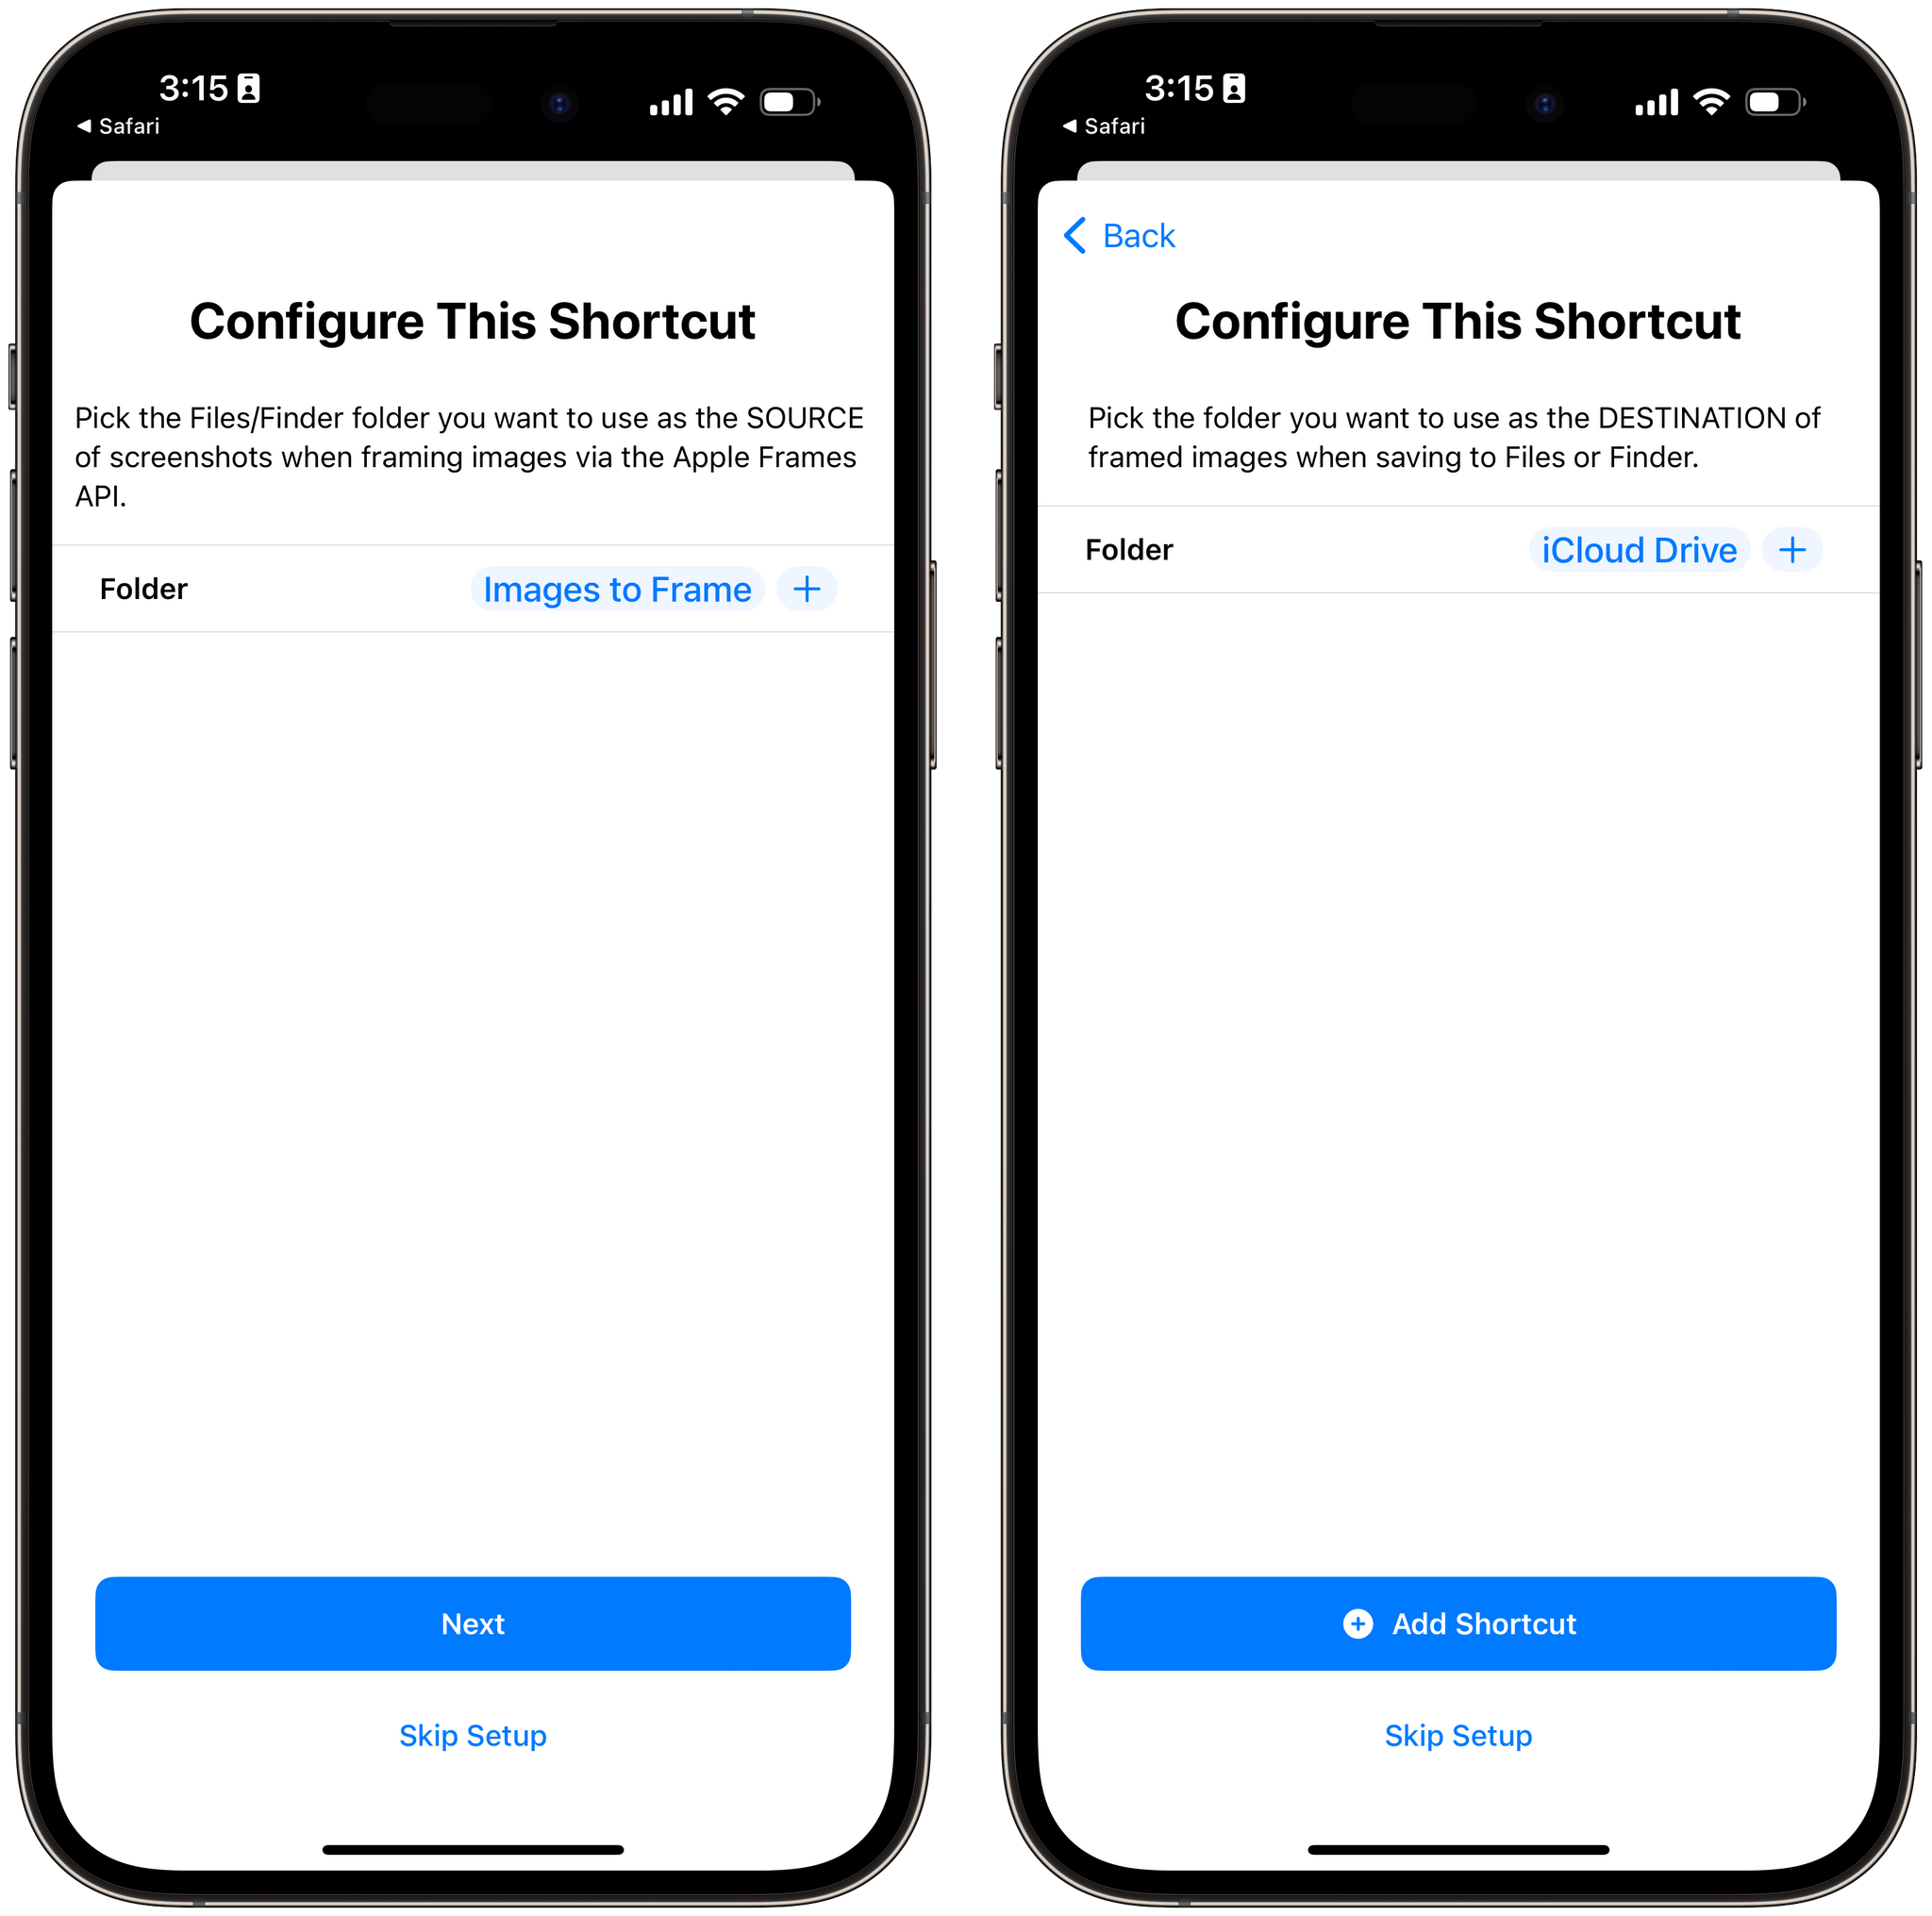
The new setup flow of Apple Frames 3.1. You can now choose a destination folder for framed images (like in version 3.0) and, for the first time, a source folder that you can use with the Apple Frames API.
Given that this version of Apple Frames includes support for more devices, you’ll also be prompted to download a new Frames.zip file from the MacStories CDN. You can just click ‘Allow’ here without worrying about anything else. The shortcut will extract the necessary assets, save them in iCloud Drive/Shortcuts, and continue automatically. You’ll only be prompted to do this once.
New Devices and Fixes
Apple Frames 3.1 re-introduces support for the following devices, which I missed in the transition to version 3.0 last year:
- iPhone 8 Plus
- Apple Watch Series 7/8 in the 41mm size
- MacBook Pro 13”
Additionally, I fixed an issue with Apple Frames 3.0 that was causing screenshots taken on an iPad Pro 11” in portrait orientation with the ‘More Space’ display scaling mode enabled to not be framed properly. My apologies to all those who tried running Apple Frames on their 11” iPad Pros and couldn’t get it to work over the past few months. I ended up buying an 11” iPad Pro myself so I could debug the issue and figure out what was going on.
Introducing the Apple Frames API
The big change in Apple Frames 3.1 is the availability of a lightweight API that lets you control the shortcut’s behavior with simple text commands. It may seem silly to make an “API” for a shortcut running on your iPhone or Mac, but this is, after all, a little programming interface for Apple Frames, so I think it’s only fair to call it that.
Here’s the gist: you can now script Apple Frames with commands that tell it where to take images from (input commands) and where to save the framed images (output commands). You can still run Apple Frames manually like you’ve always done; however, if you want to save even more time, you can also program Apple Frames 3.1 to get screenshots from a specific source and perform a specific action with the output without having to manually pick images or options from a list.
The Apple Frames API is entirely optional and designed for advanced users of the shortcut who want to take their usage of Apple Frames to the next level.
The new Apple Frames API is comprised of input commands and output commands. These are bits of text that you can pass to the shortcut to tell it where to get images and what to do with them. And here’s my favorite part: you can mix and match input and output commands however you like, creating diverse “recipes” for automating Apple Frames in different contexts. For example, you can create an Apple Frames automation to get the most recent screenshot, frame it, and save it to the Photos app with no manual interactions; or you can automate Apple Frames to get the 10 most recent screenshots from your library, frame them individually without merging them, and save the results in a folder of the Files app.
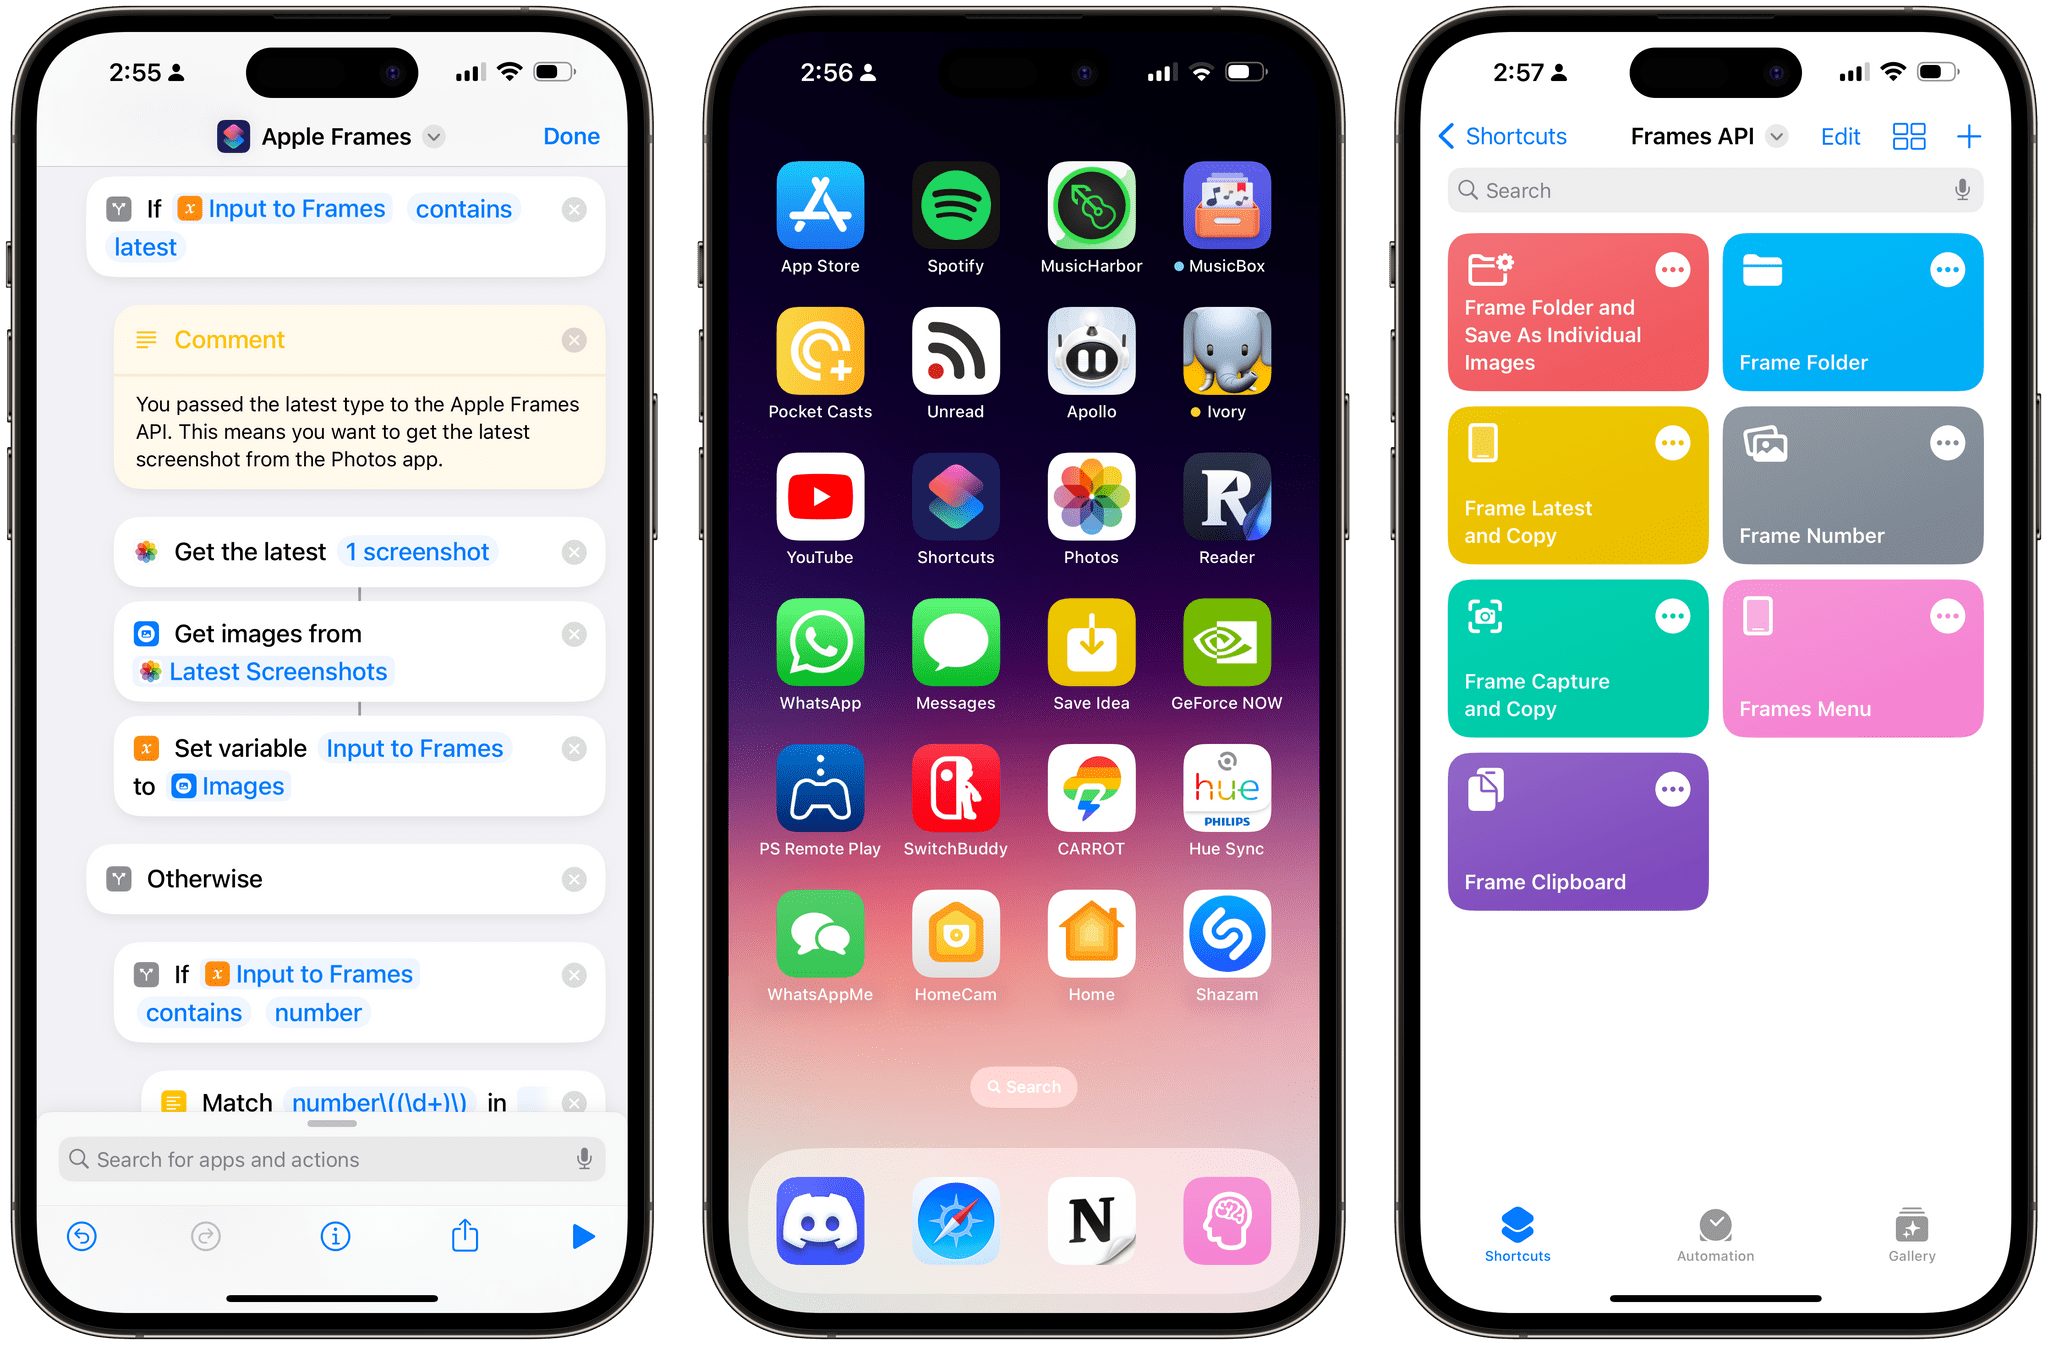
When I refer to the ability to “pass” commands to Apple Frames 3.1, I mean it. The Apple Frames API was designed to be as simple as giving Apple Frames a ‘Text’ action to use as input, as shown in the image below:
Of course, if you’re an advanced user, you have other options too. You can pass commands to Apple Frames 3.1 via the URL scheme or, if you’re a Mac user, via the shell. Any input method that can pass some text to Shortcuts will work.
Input Commands
With that being said, here are the input commands supported by Apple Frames 3.1:
pickPick images manually. (This command is mandatory if you don’t want to use any other input command, but still want an output command later.)clipboardGet an image from the system clipboard.latestGet the latest screenshot.number(n)Pass a numeric value to Apple Frames that tells it how many recent screenshots to retrieve from the photo library. e.g.number(5)will tell Apple Frames to get the five most recent screenshots.captureAsk Apple Frames to capture a screenshot and frame it immediately. Best used on macOS, where you can trigger shortcuts with the keyboard without a UI shown.folderGet images from a specific folder in Files or Finder.
These input commands should be fairly self-explanatory: they tell Apple Frames where to get images, giving you more flexibility than having to select images manually every time.
The only input command that needs to be configured is the folder one: in the shortcut, you’ll find a ‘Folder’ action that determines the folder in Files/Finder that you want to use as the source of images for the Apple Frames API. You can change this to whatever you want.
Output Commands
So those are the input commands. Here is the list of output commands you can use in Apple Frames 3.1:
&quickLookPreview images with Quick Look.&photosSave framed images to the Photos app.&quickSaveSave framed images to a specific folder of your choice in Files/Finder.©Copy framed images to the clipboard.&airDropInstantly AirDrop framed images.&uploadIf you have a shortcut that uploads images to your own server or other places, this is the output command that can trigger it.&passthroughPass framed images as output to the next Shortcuts action. The resulting variable should be set as an ‘Image’ variable. More details here.
Output commands, as I noted above, can be chained after an input command; using an output command automates the process of saving a framed image somewhere, and it lets you bypass the final menu of actions that gets shown by Apple Frames at the end of the shortcut. By combining input and output commands, you’ll be able to fully automate the image generation process of Apple Frames, from source files to the resulting framed image, with zero user interaction in the middle. Make sure to check out the list of examples I prepared in the next section to get a sense of how you can combine these.
Merge Mode
Lastly, Apple Frames 3.1 comes with an option that has been requested dozens of times by advanced users: the ability to frame images individually, without merging them in a single composite image at the end. This option is available as a shortcut-wide toggle as well as a flag in the API.
For starters, toward the beginning of the shortcut, you’ll see a new Merge Images variable that is set to ‘True’. This means that, by default, Apple Frames will merge multiple framed screenshots into a single image, as it’s always done. If you want to alter the default behavior of Apple Frames, you can change this variable to ‘False.’
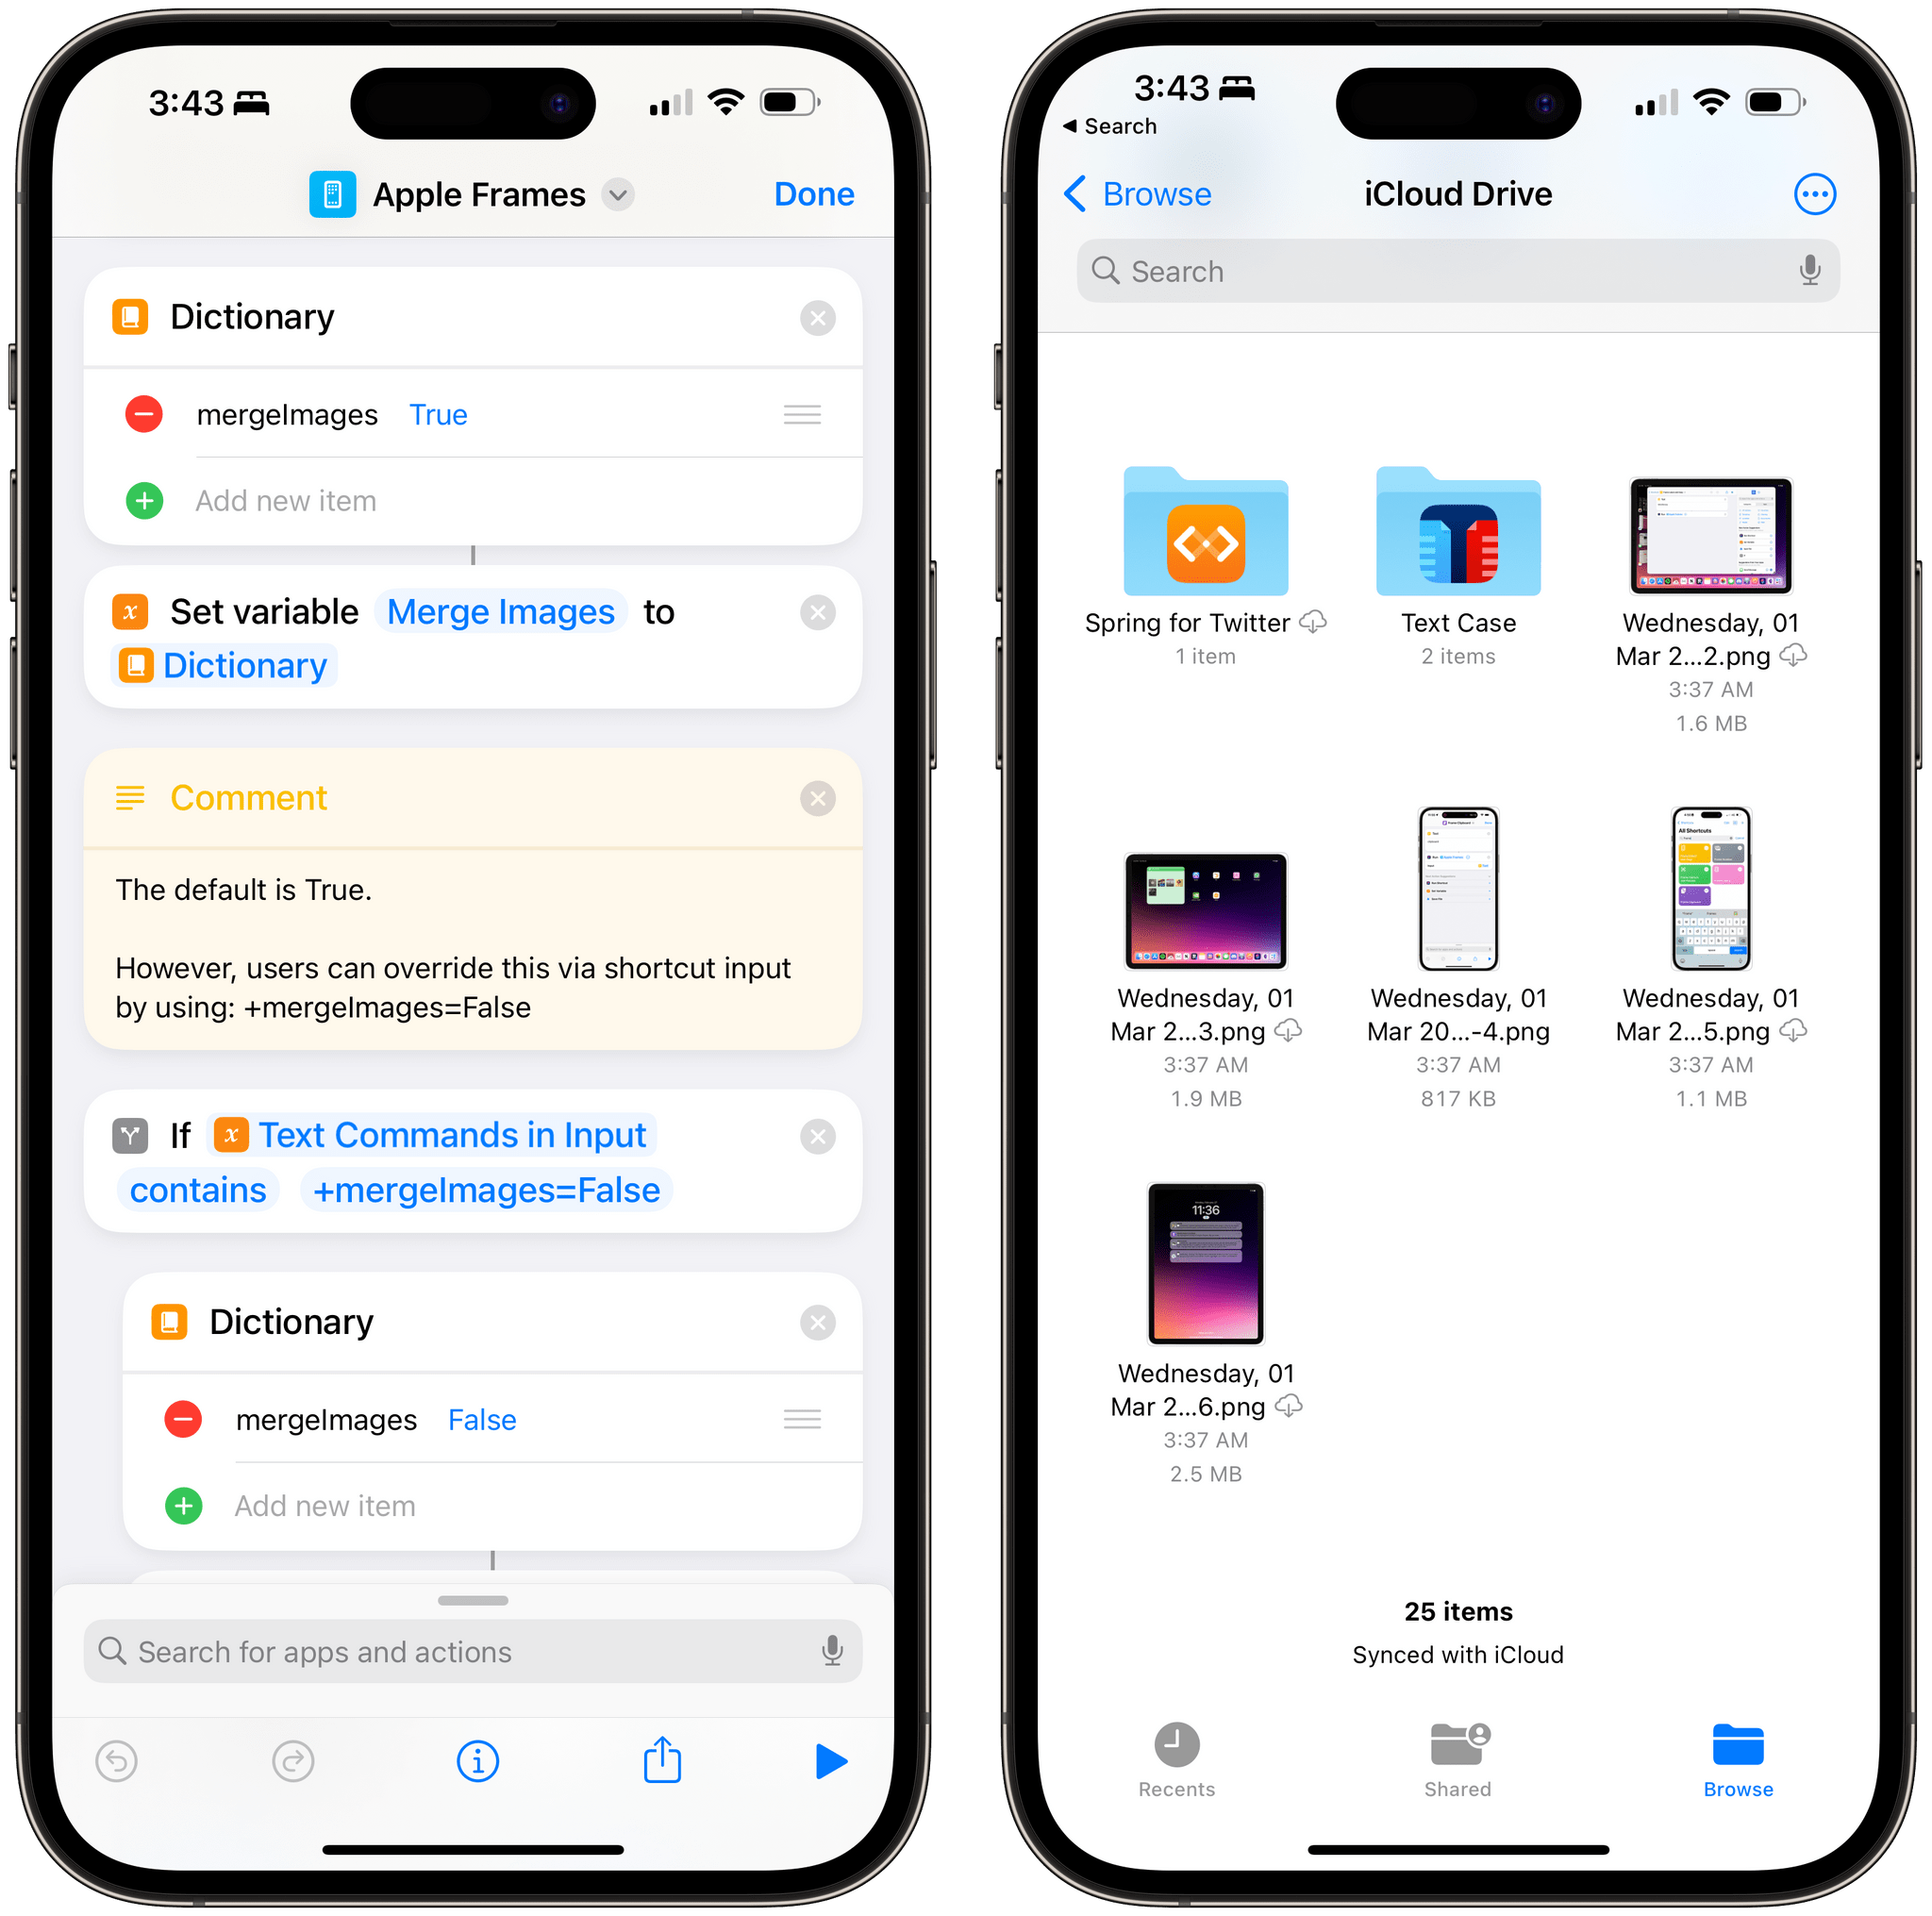
The new variable that controls the merging behavior in Apple Frames 3.1 (left) and images that have been framed individually (right).
If you want to keep Apple Frames’ default merging behavior but override it every once in a while when needed, you can use the Apple Frames API. By passing +mergeImages=False to Apple Frames (alongside at least one input command), you’ll temporarily override the merging behavior of Apple Frames and tell it to save images individually if it normally merges them, and vice versa. For example, this…
pick+mergeImages=False
…will let you pick screenshots to frame, then save the results as individual images at the end.
With this new merge option in the Apple Frames API, you’ll be able to temporarily override the merging behavior of Apple Frames.
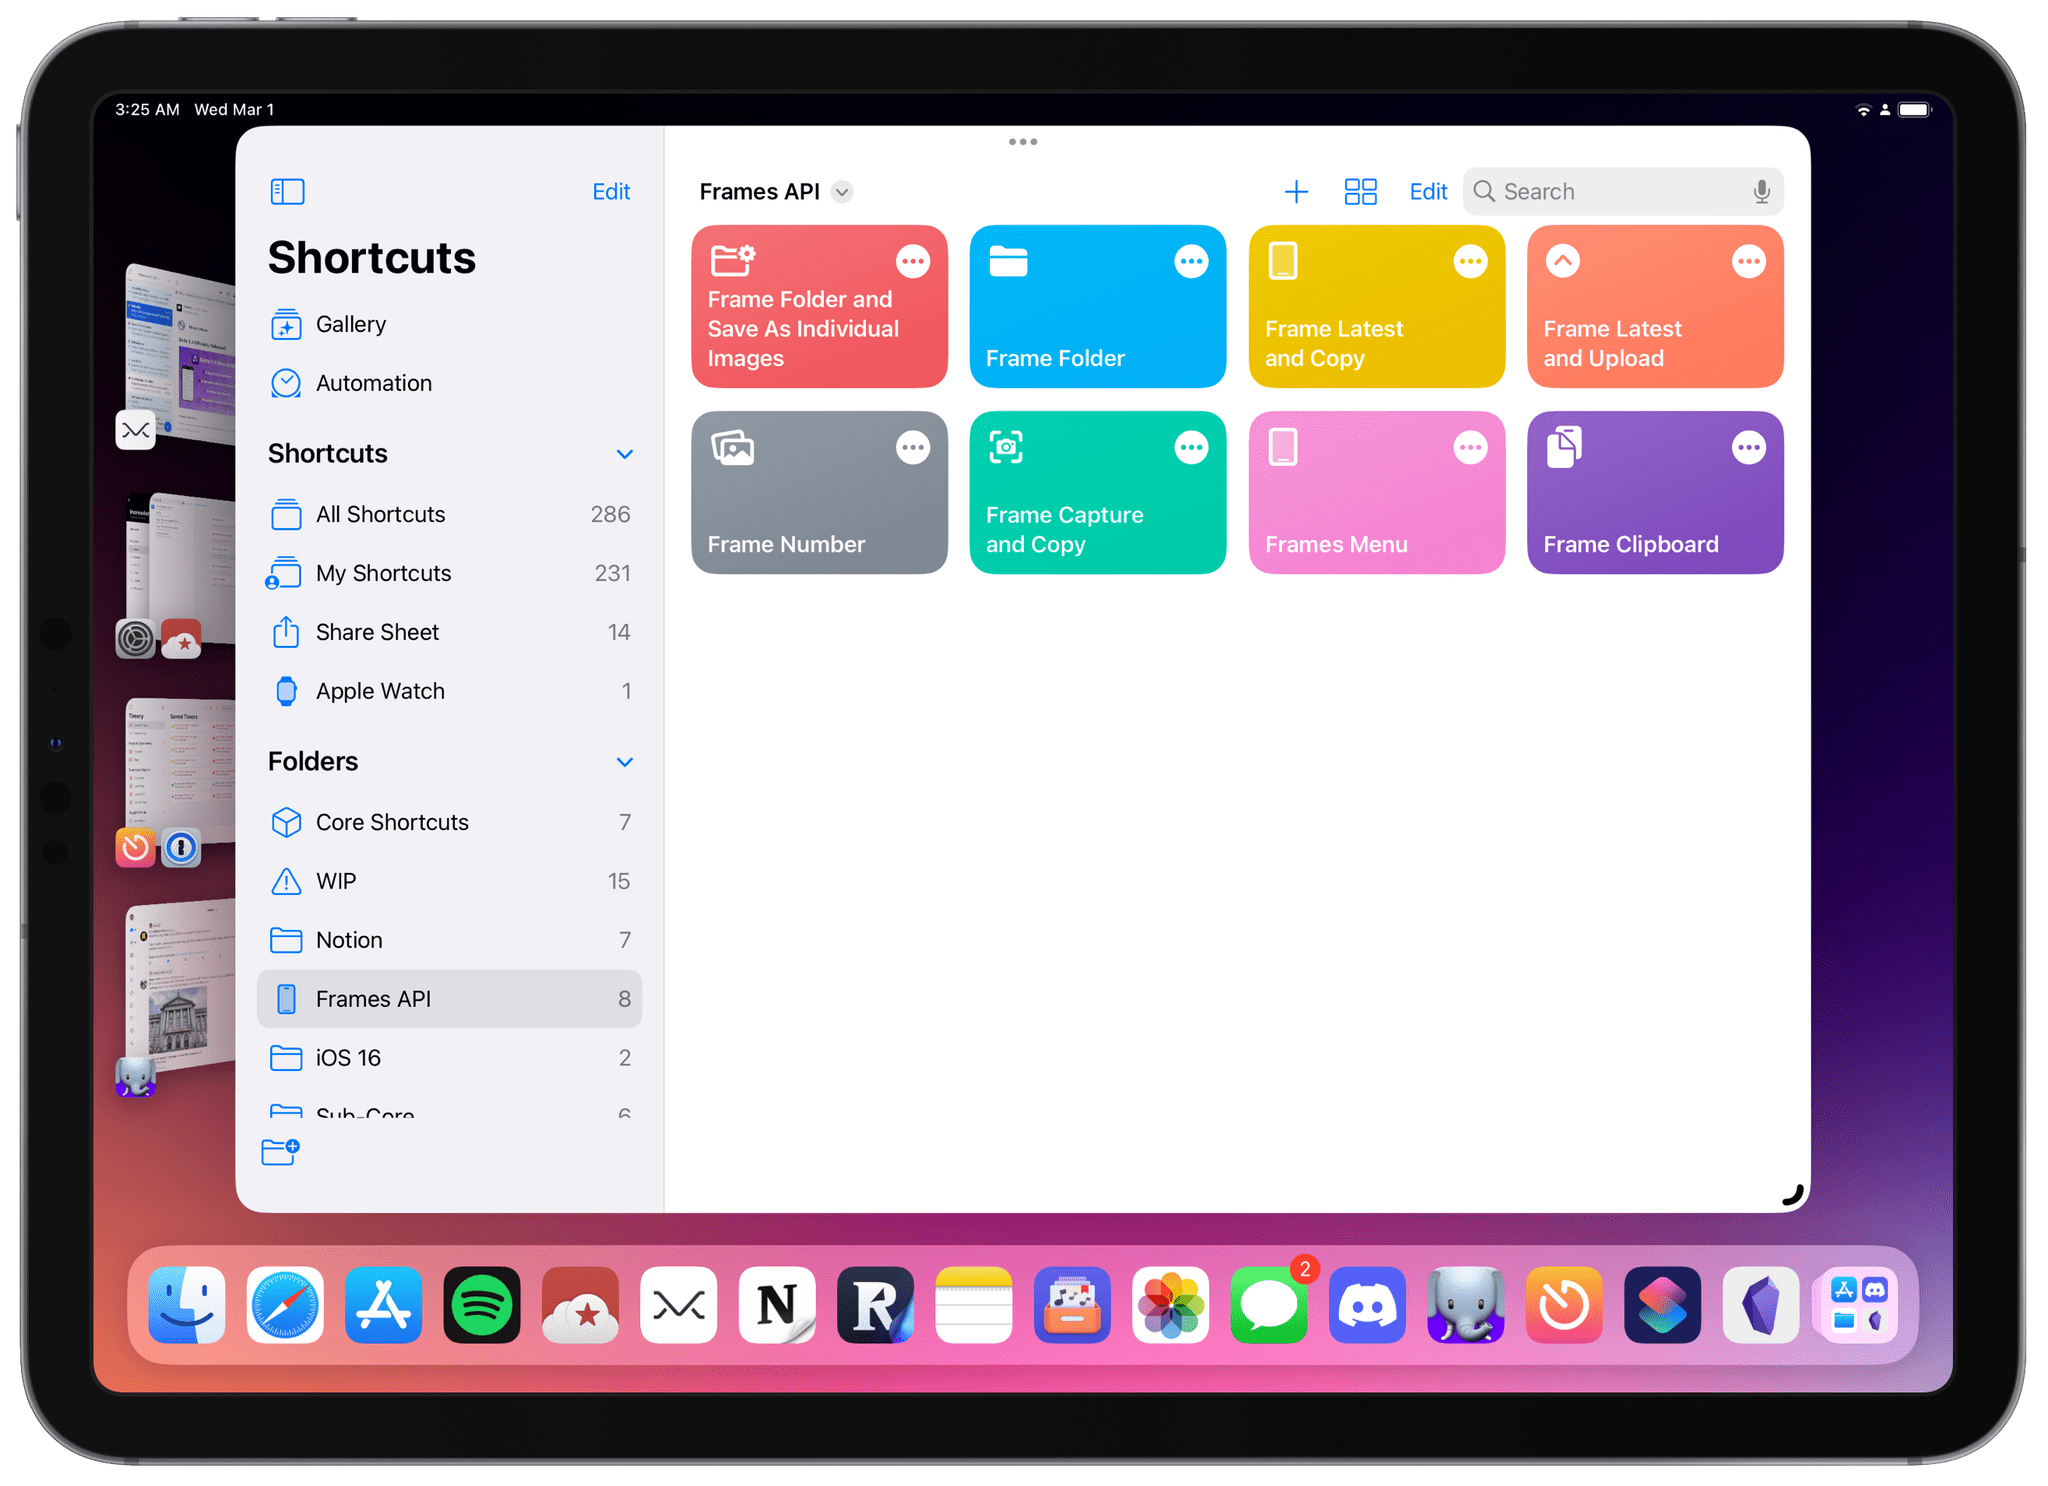
Examples of the Apple Frames API with Helper Shortcuts
Since the Apple Frames API is based on passing some text input to the shortcut, you can put together “helper shortcuts” to perform specific actions in Apple Frames and rely on them as standalone utilities. These are simple, two-action shortcuts that send specific commands to Apple Frames.
If you’re a Mac user, the Apple Frames API opens a world of possibilities: not only can you create all the helper shortcuts you want and assign a global hotkey to each one of them, but you can even trigger these dedicated utilities from the menu bar, via scripts, or via utilities like Raycast and Alfred.
Let me give you some practical examples of how you can use these commands and chain them together.
The first helper shortcut I created for Apple Frames 3.1 tells it to get the latest screenshot from the Photos app, frame it, and immediately copy the framed image to the clipboard. This lets you go from a screenshot to a framed image ready to be shared in iMessage or other apps in two seconds, especially if you trigger this shortcut from a widget on your Home Screen or Siri. Here’s how easy it is to put together:
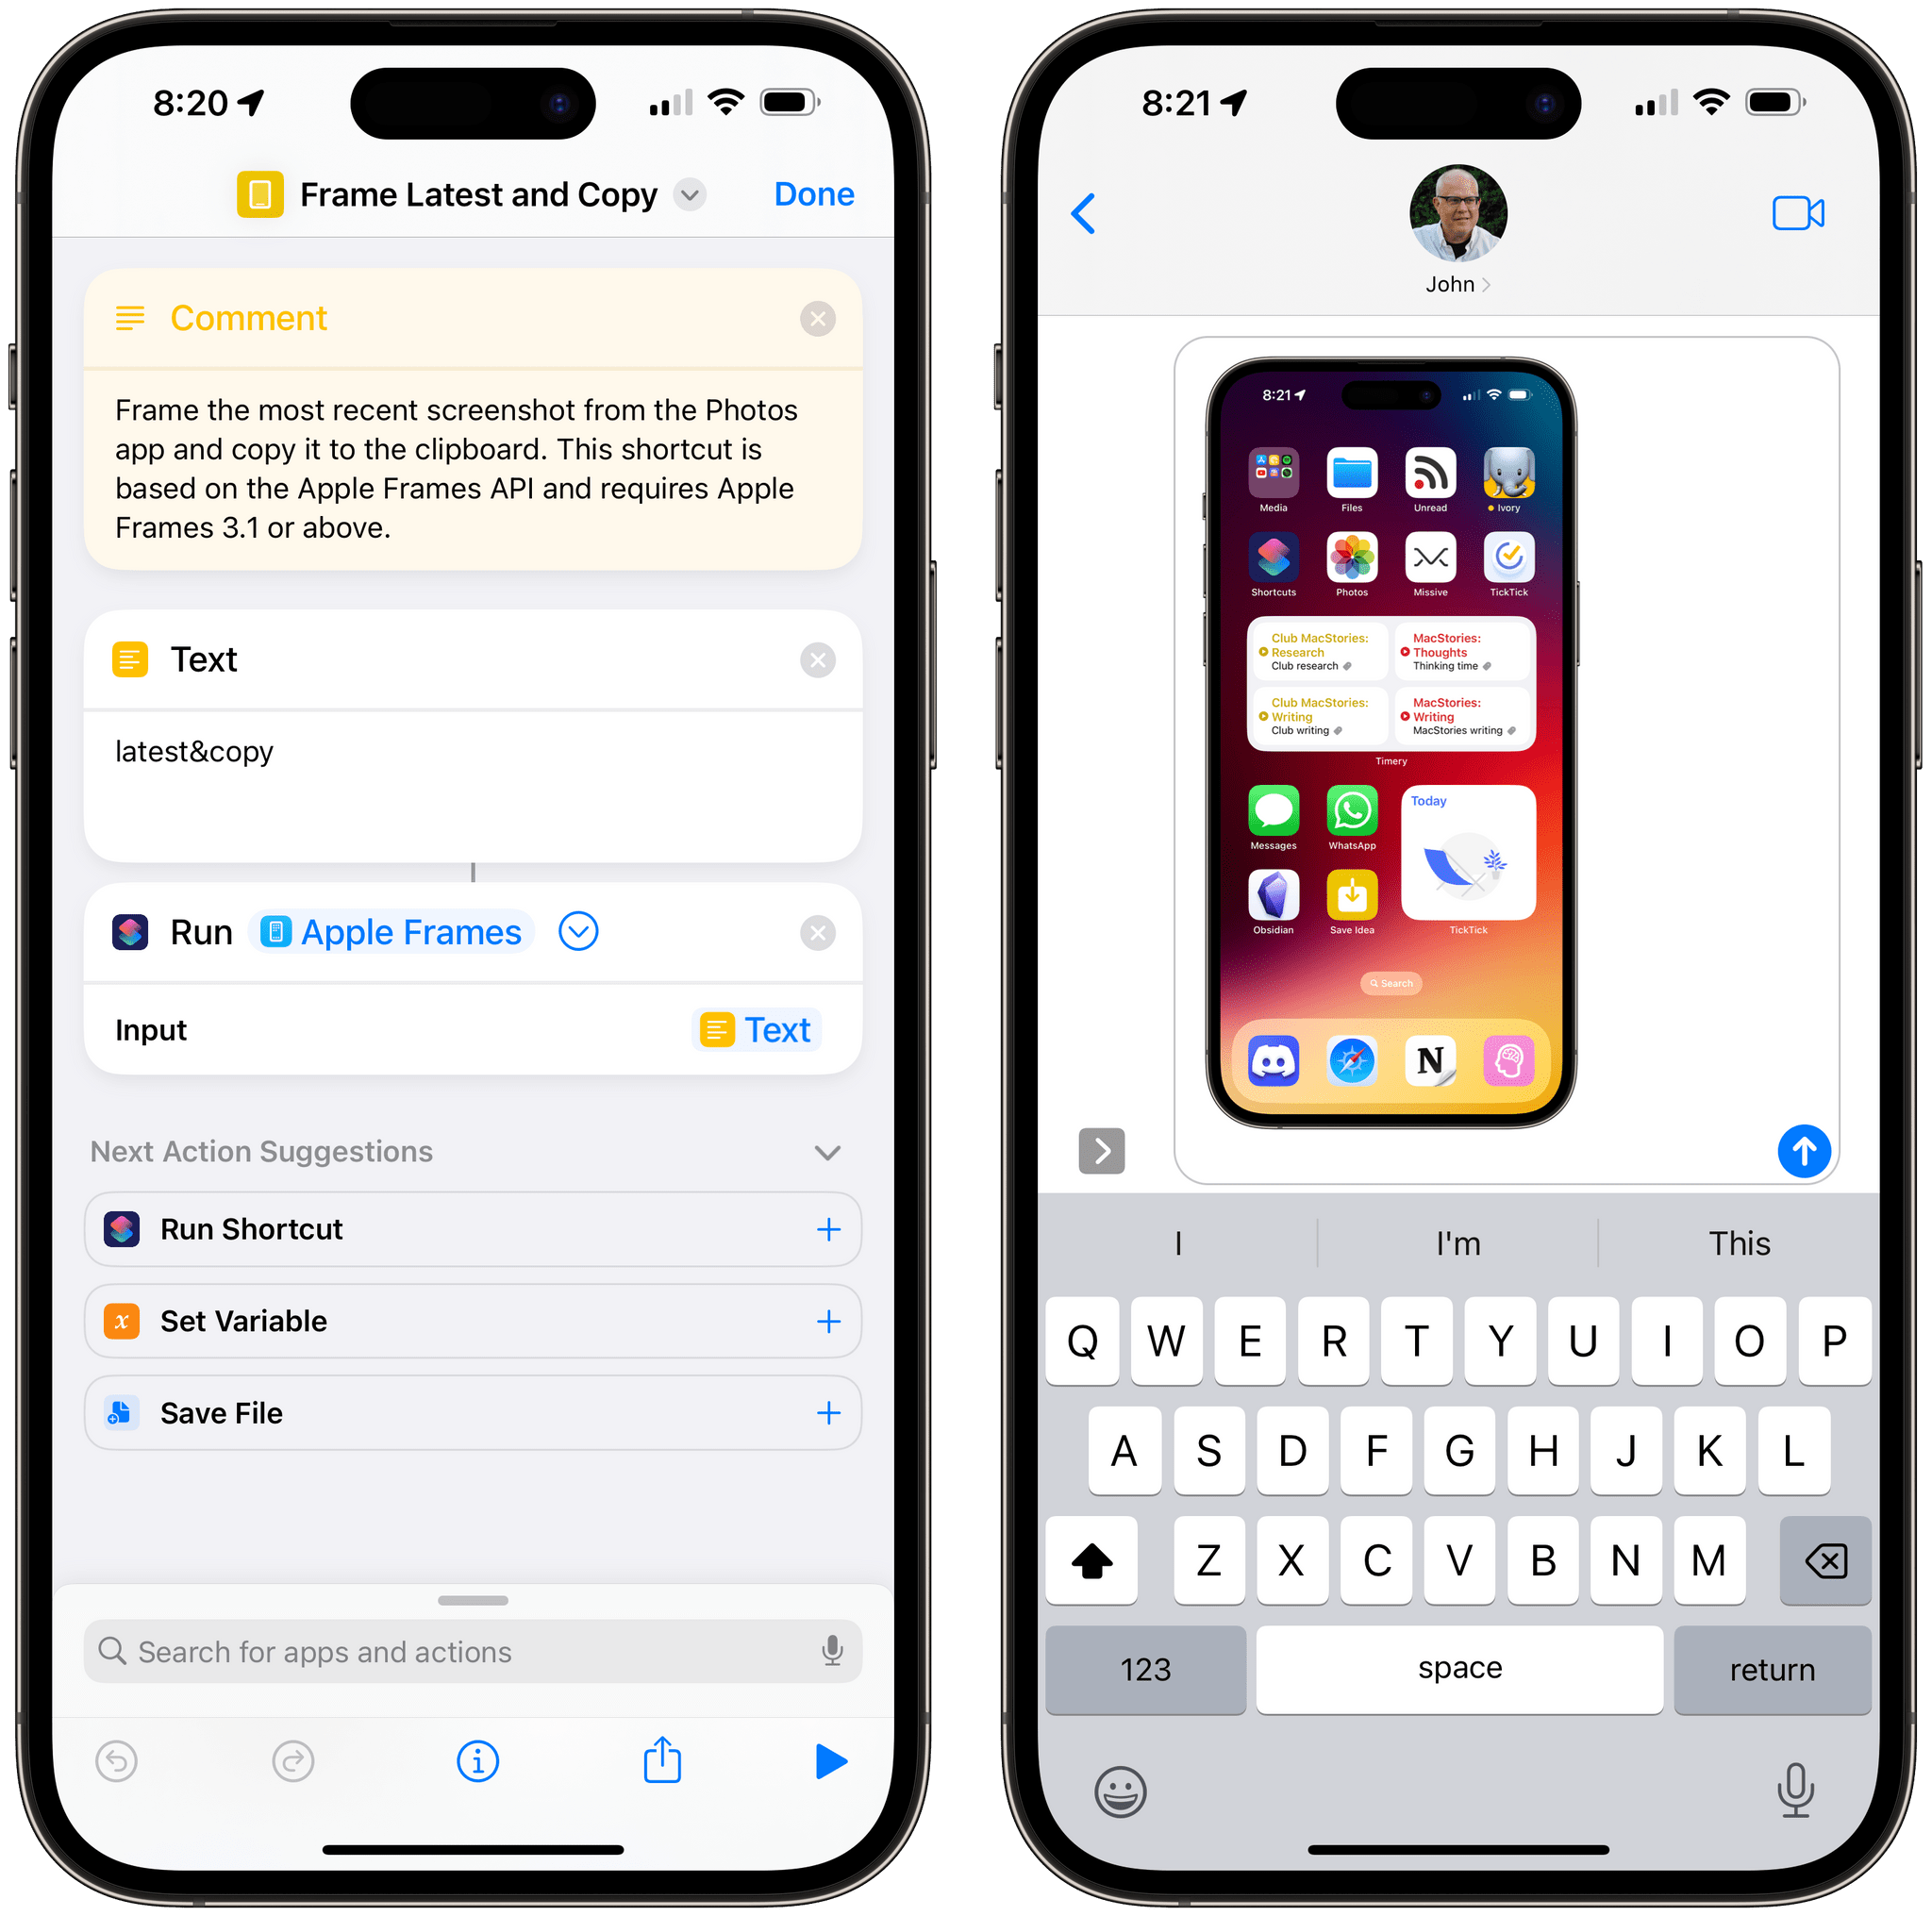
Framing the latest screenshot I’ve taken with this helper shortcut so I can quickly paste it in iMessage.
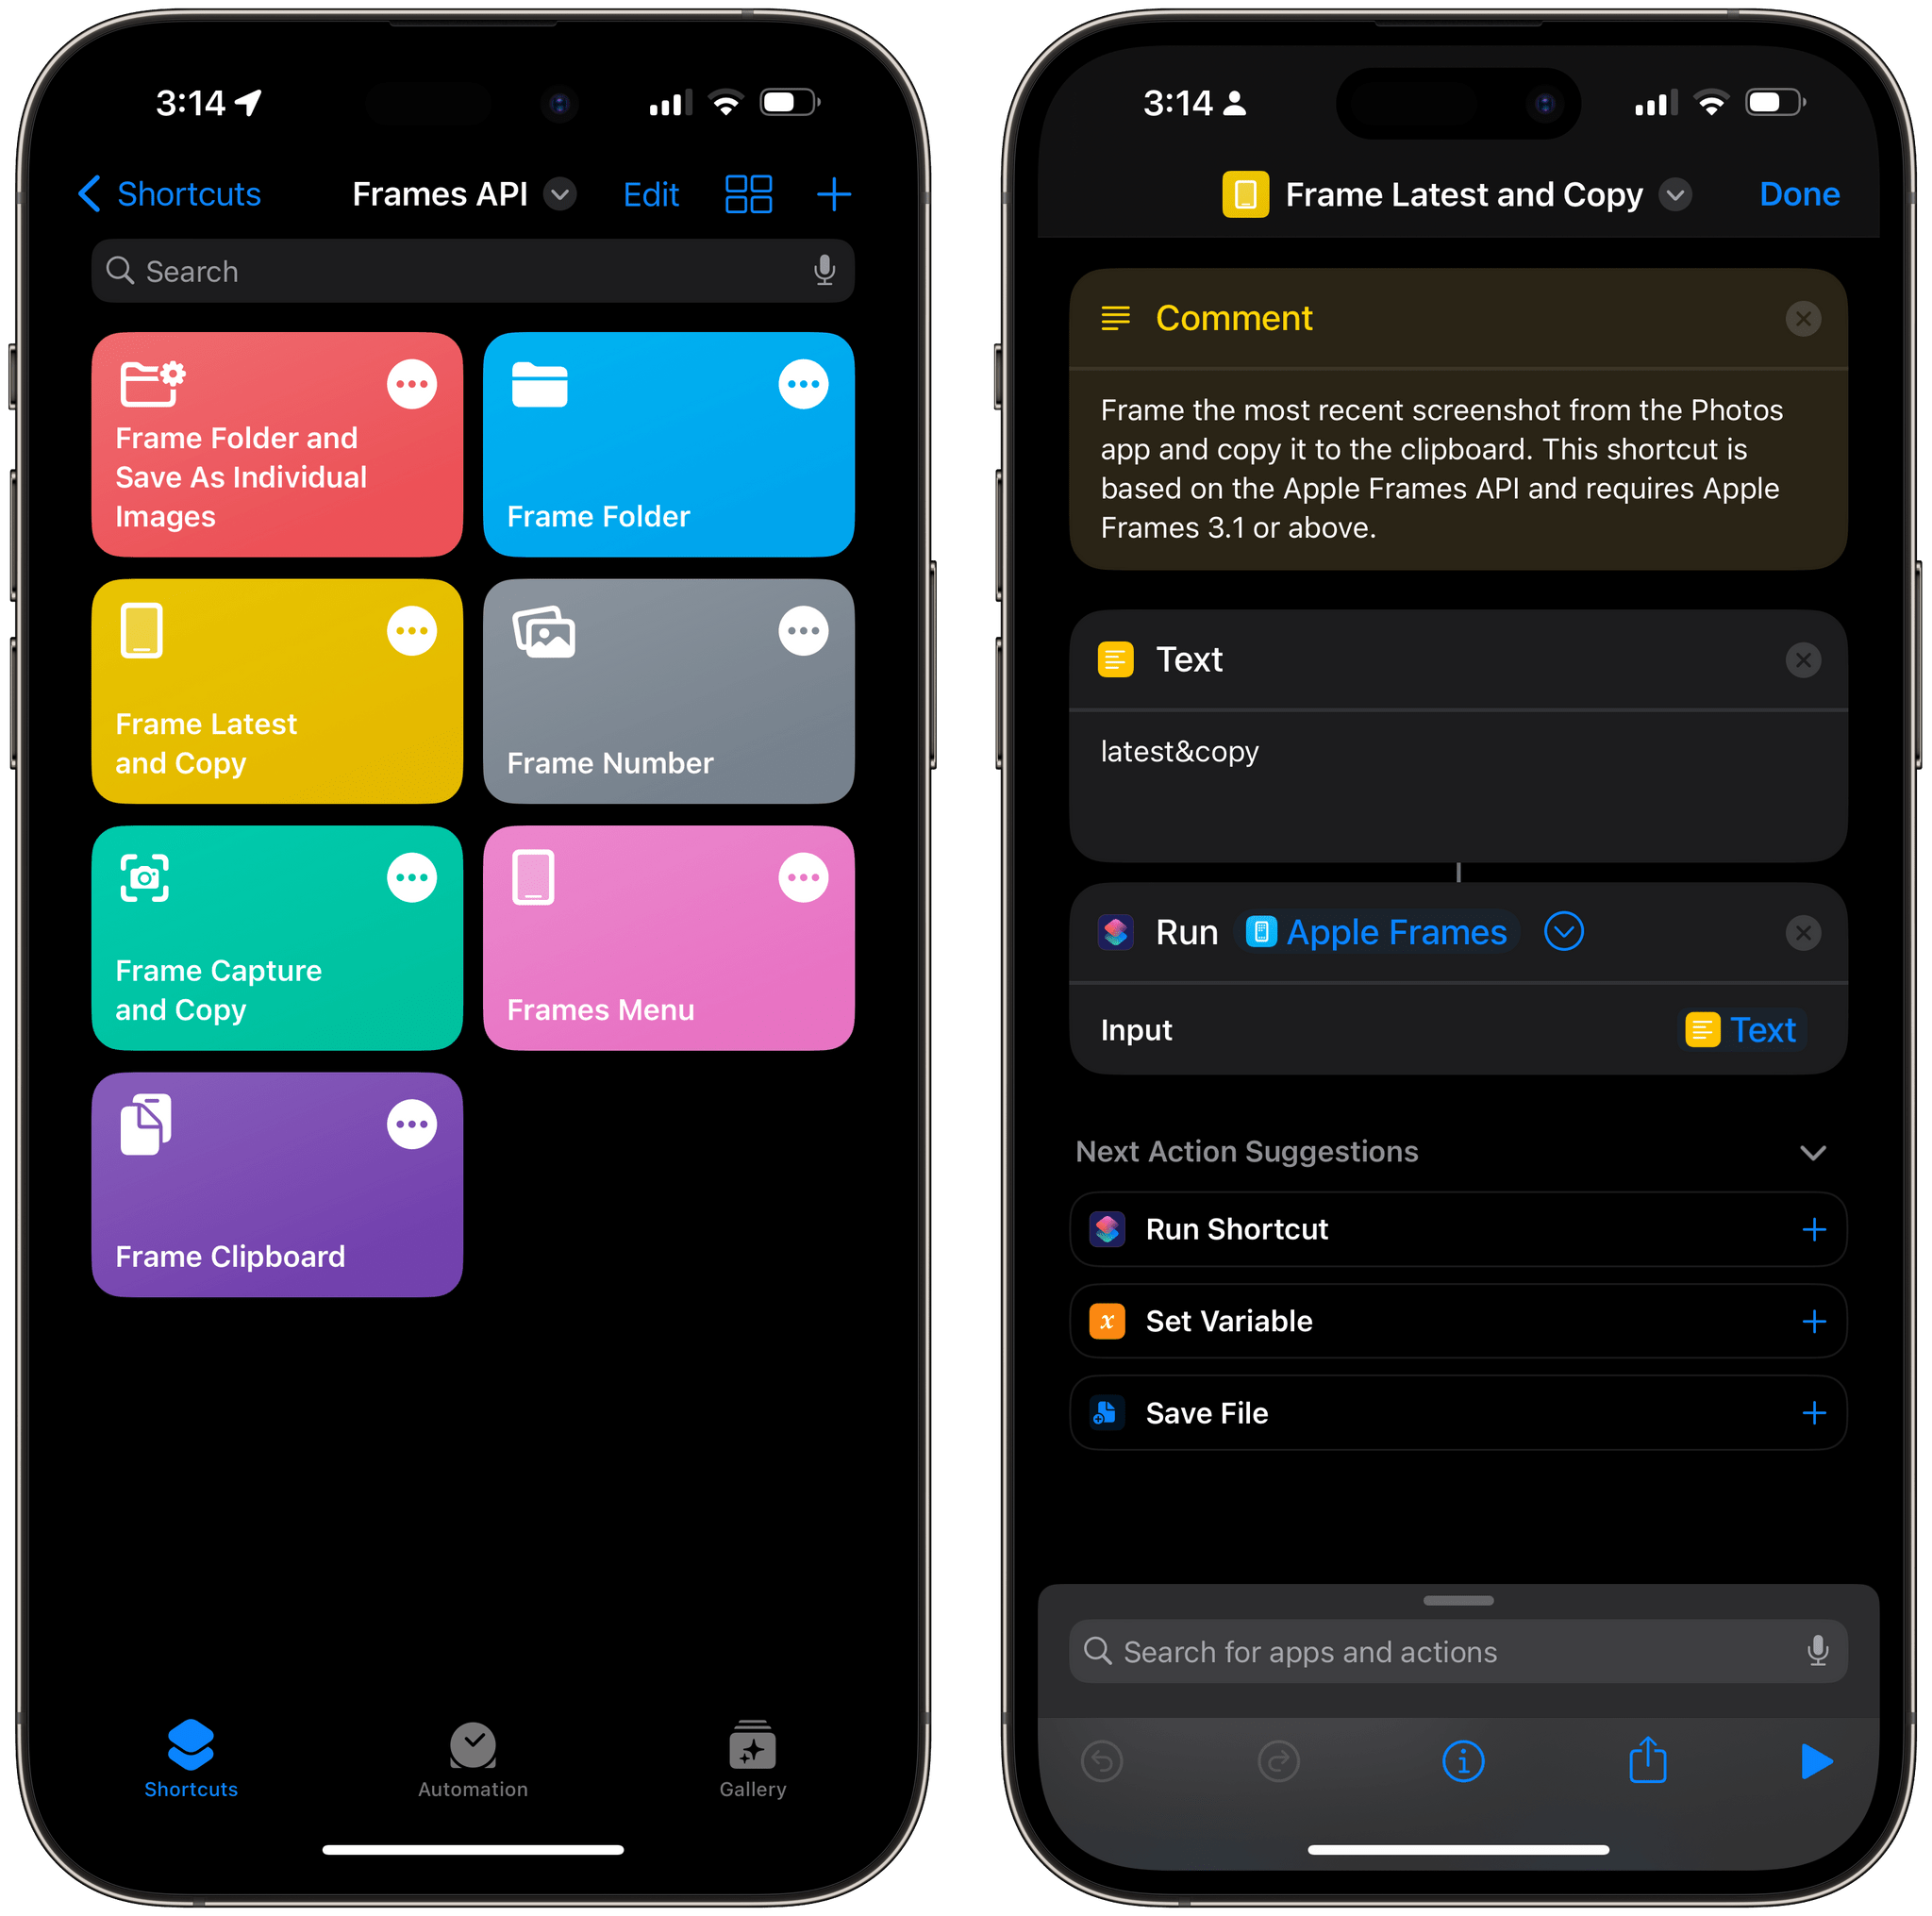
Frame Latest and Copy
Frame the most recent screenshot from the Photos app and copy it to the clipboard. This shortcut is based on the Apple Frames API and requires Apple Frames 3.1 or above.
What if you have a screenshot in your clipboard and want to quickly save it to a predefined folder in the Files app or Finder? Easy: using the clipboard&quickSave commands with the Apple Frames API, you can put together a helper shortcut to do exactly that in seconds:
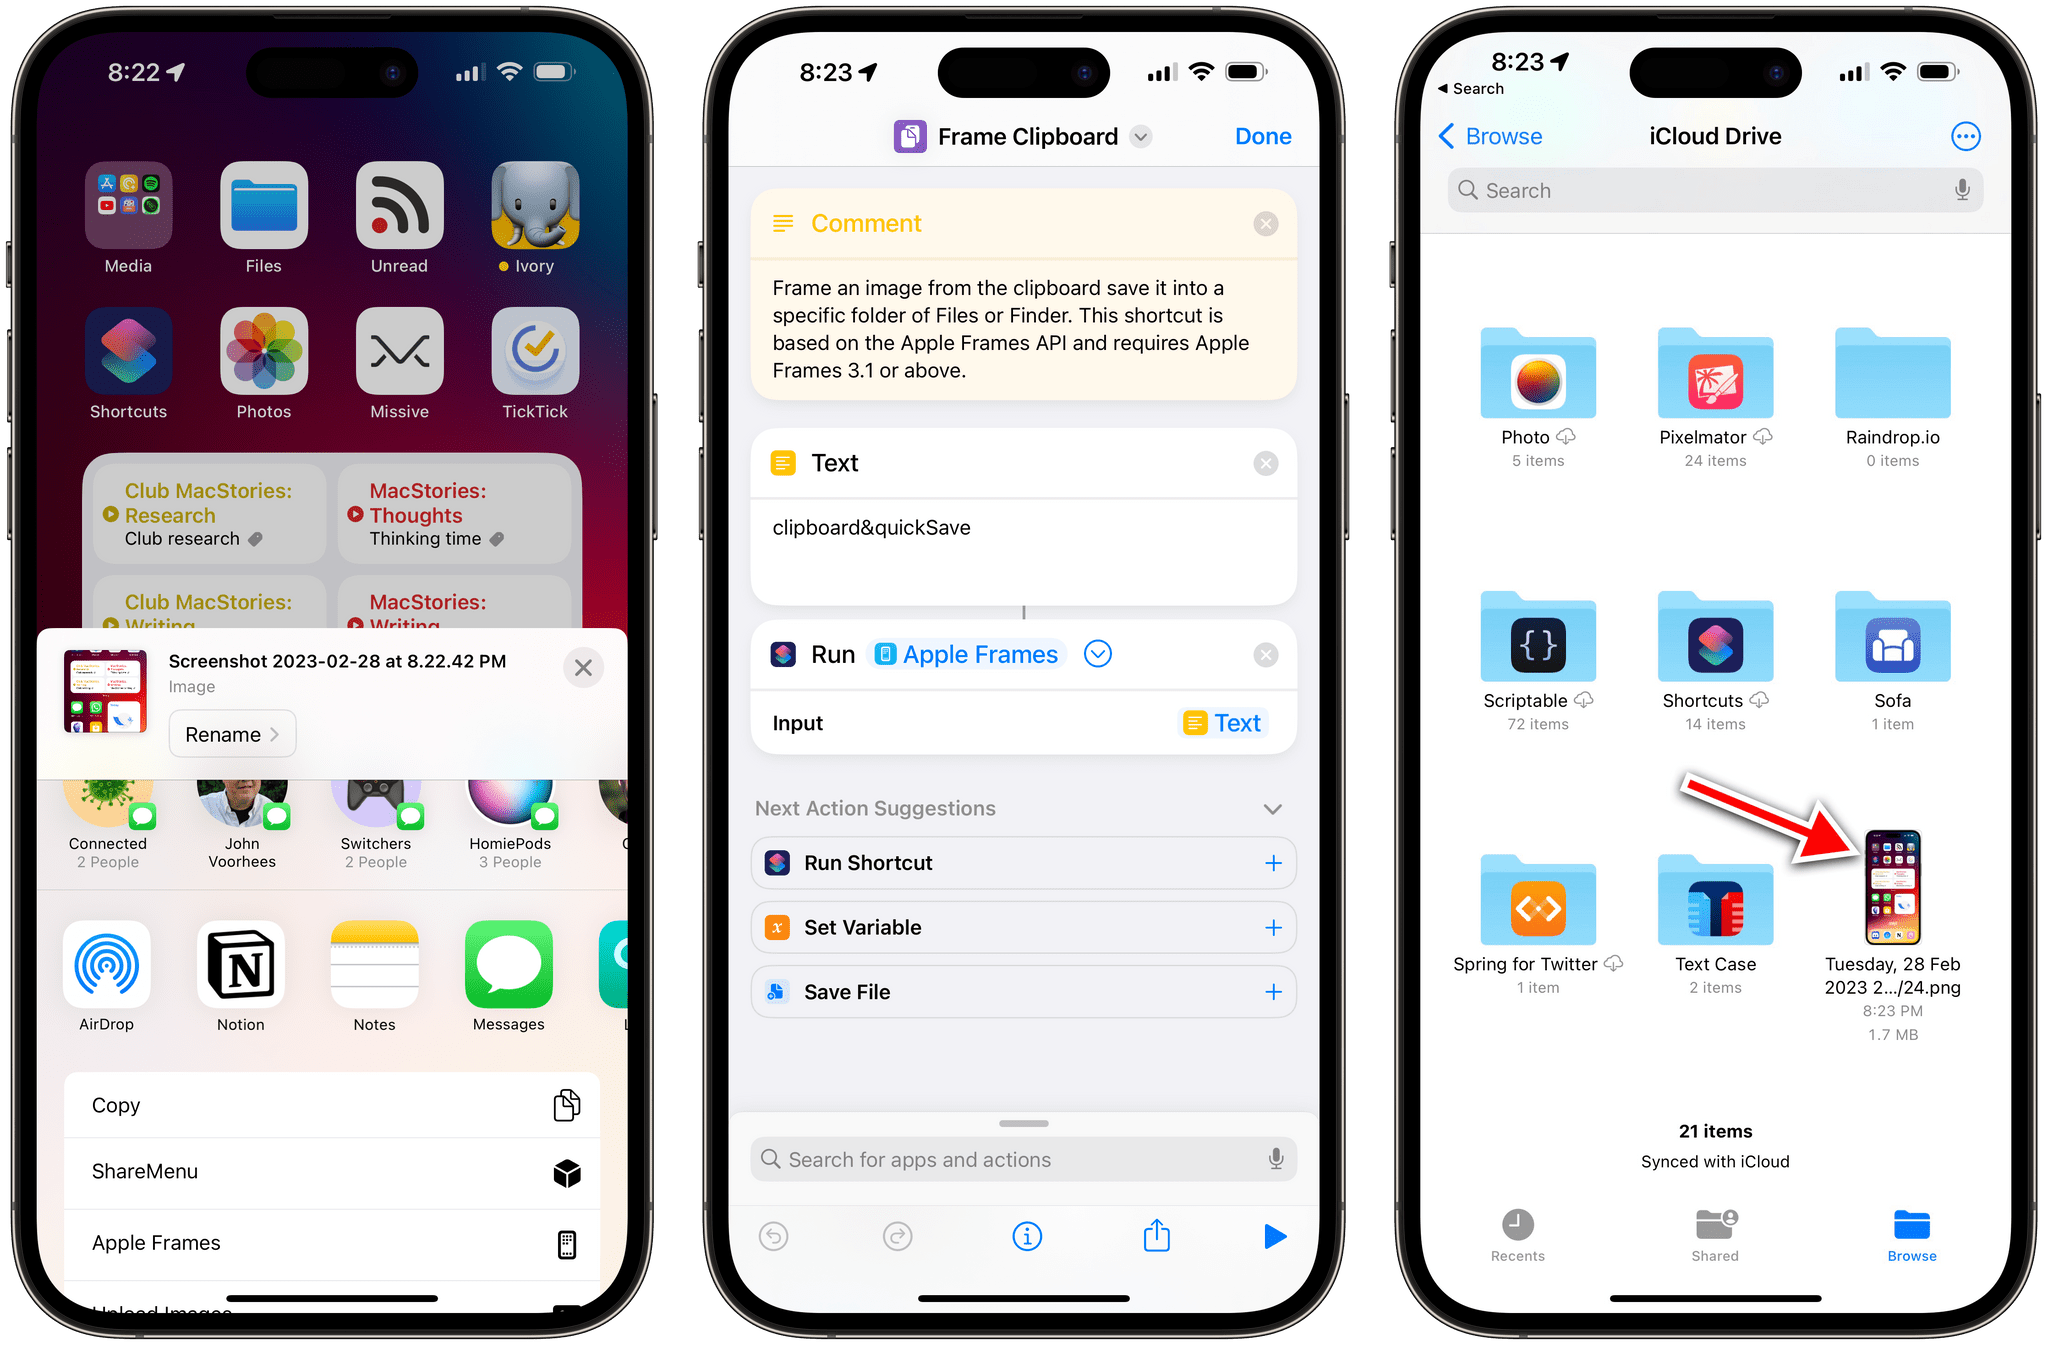
Frame Clipboard
Frame an image from the clipboard and save it into a specific folder of Files or Finder. This shortcut is based on the Apple Frames API and requires Apple Frames 3.1 or above.
How about getting all images from a folder, framing them, and deciding what to do with them at the end? Not a problem: with the Apple Frames API, you can omit an output command and just tell Apple Frames to work with a folder as an input command, like so:
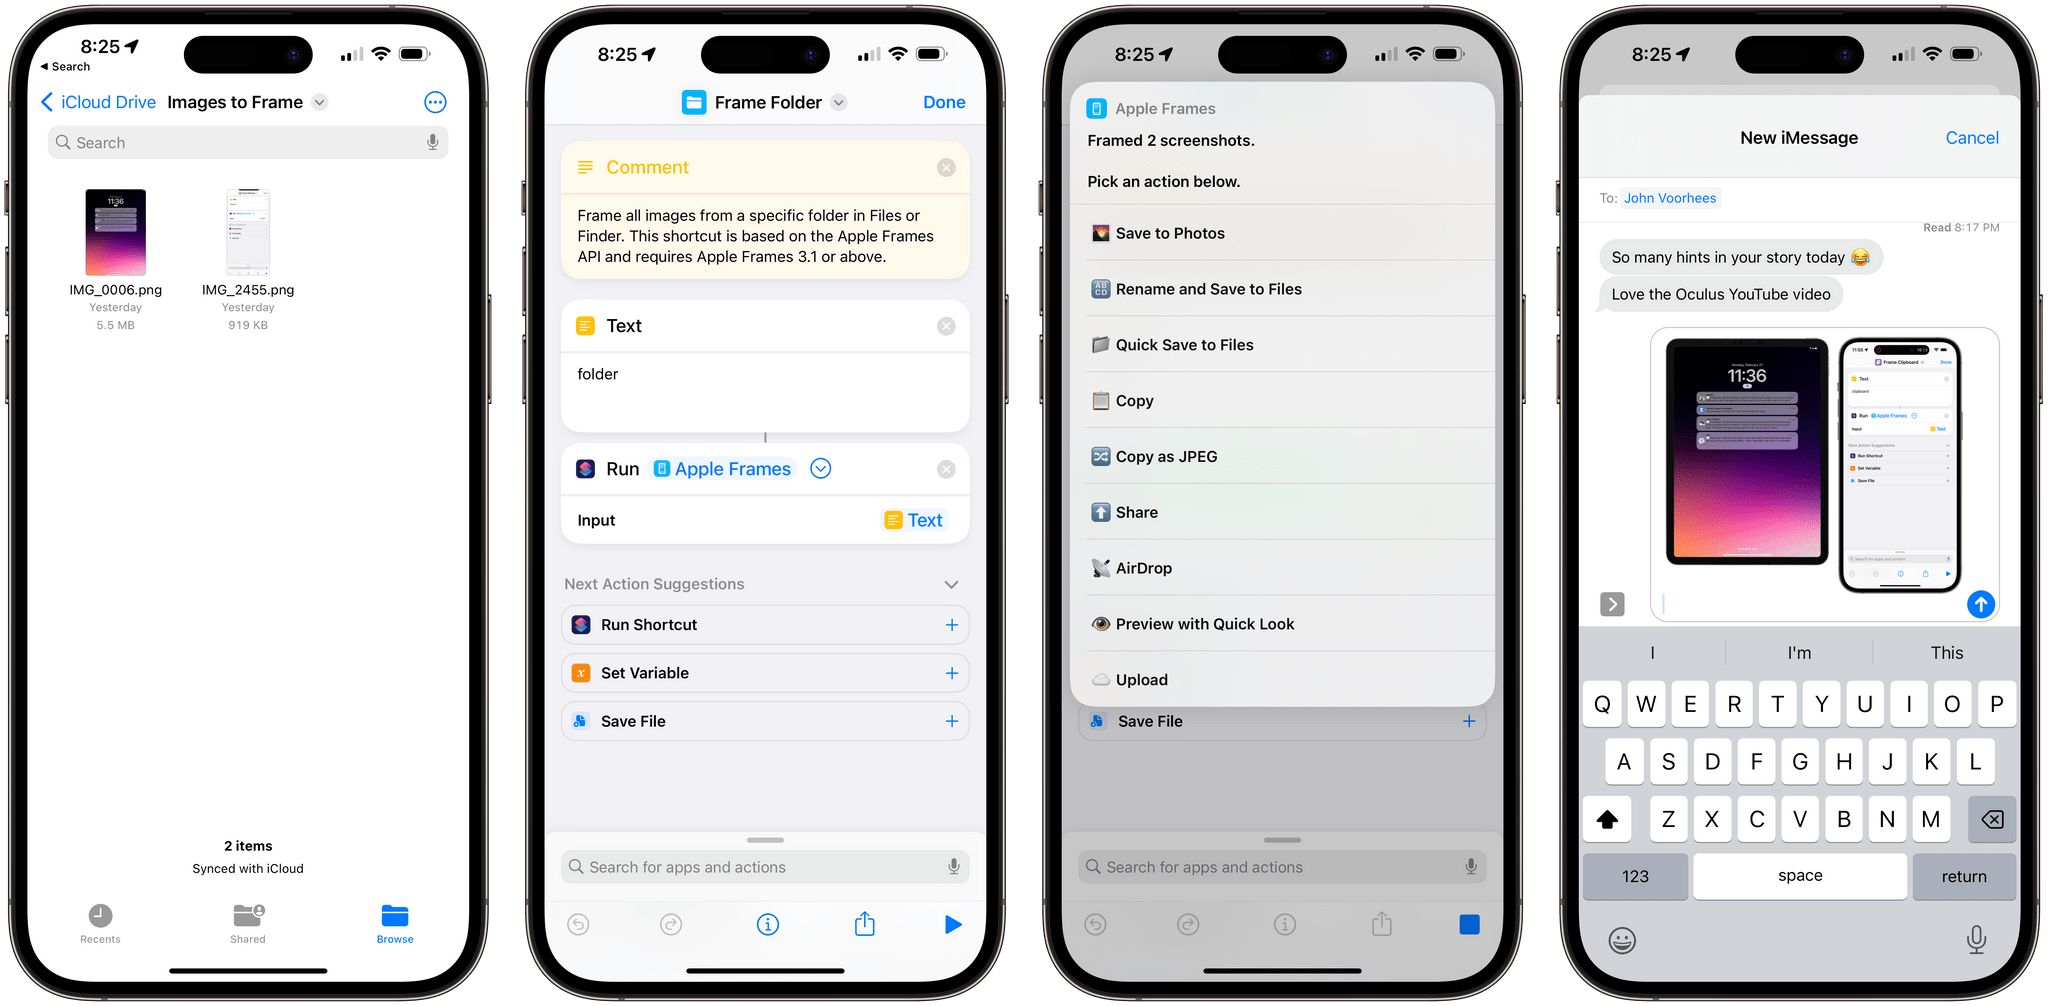
Frame Folder
Frame all images from a specific folder in Files or Finder. This shortcut is based on the Apple Frames API and requires Apple Frames 3.1 or above.
Let me get a bit fancier now. Let’s say you want to frame a specific number of recent screenshots, save them in a predefined folder, and override Apple Frames’ merging behavior so that you get a bunch of standalone framed images instead of a single composite one. By chaining together multiple commands, the Frame Number helper shortcut does it: it’ll ask you for a number, get those screenshots, frame them individually, and save them.
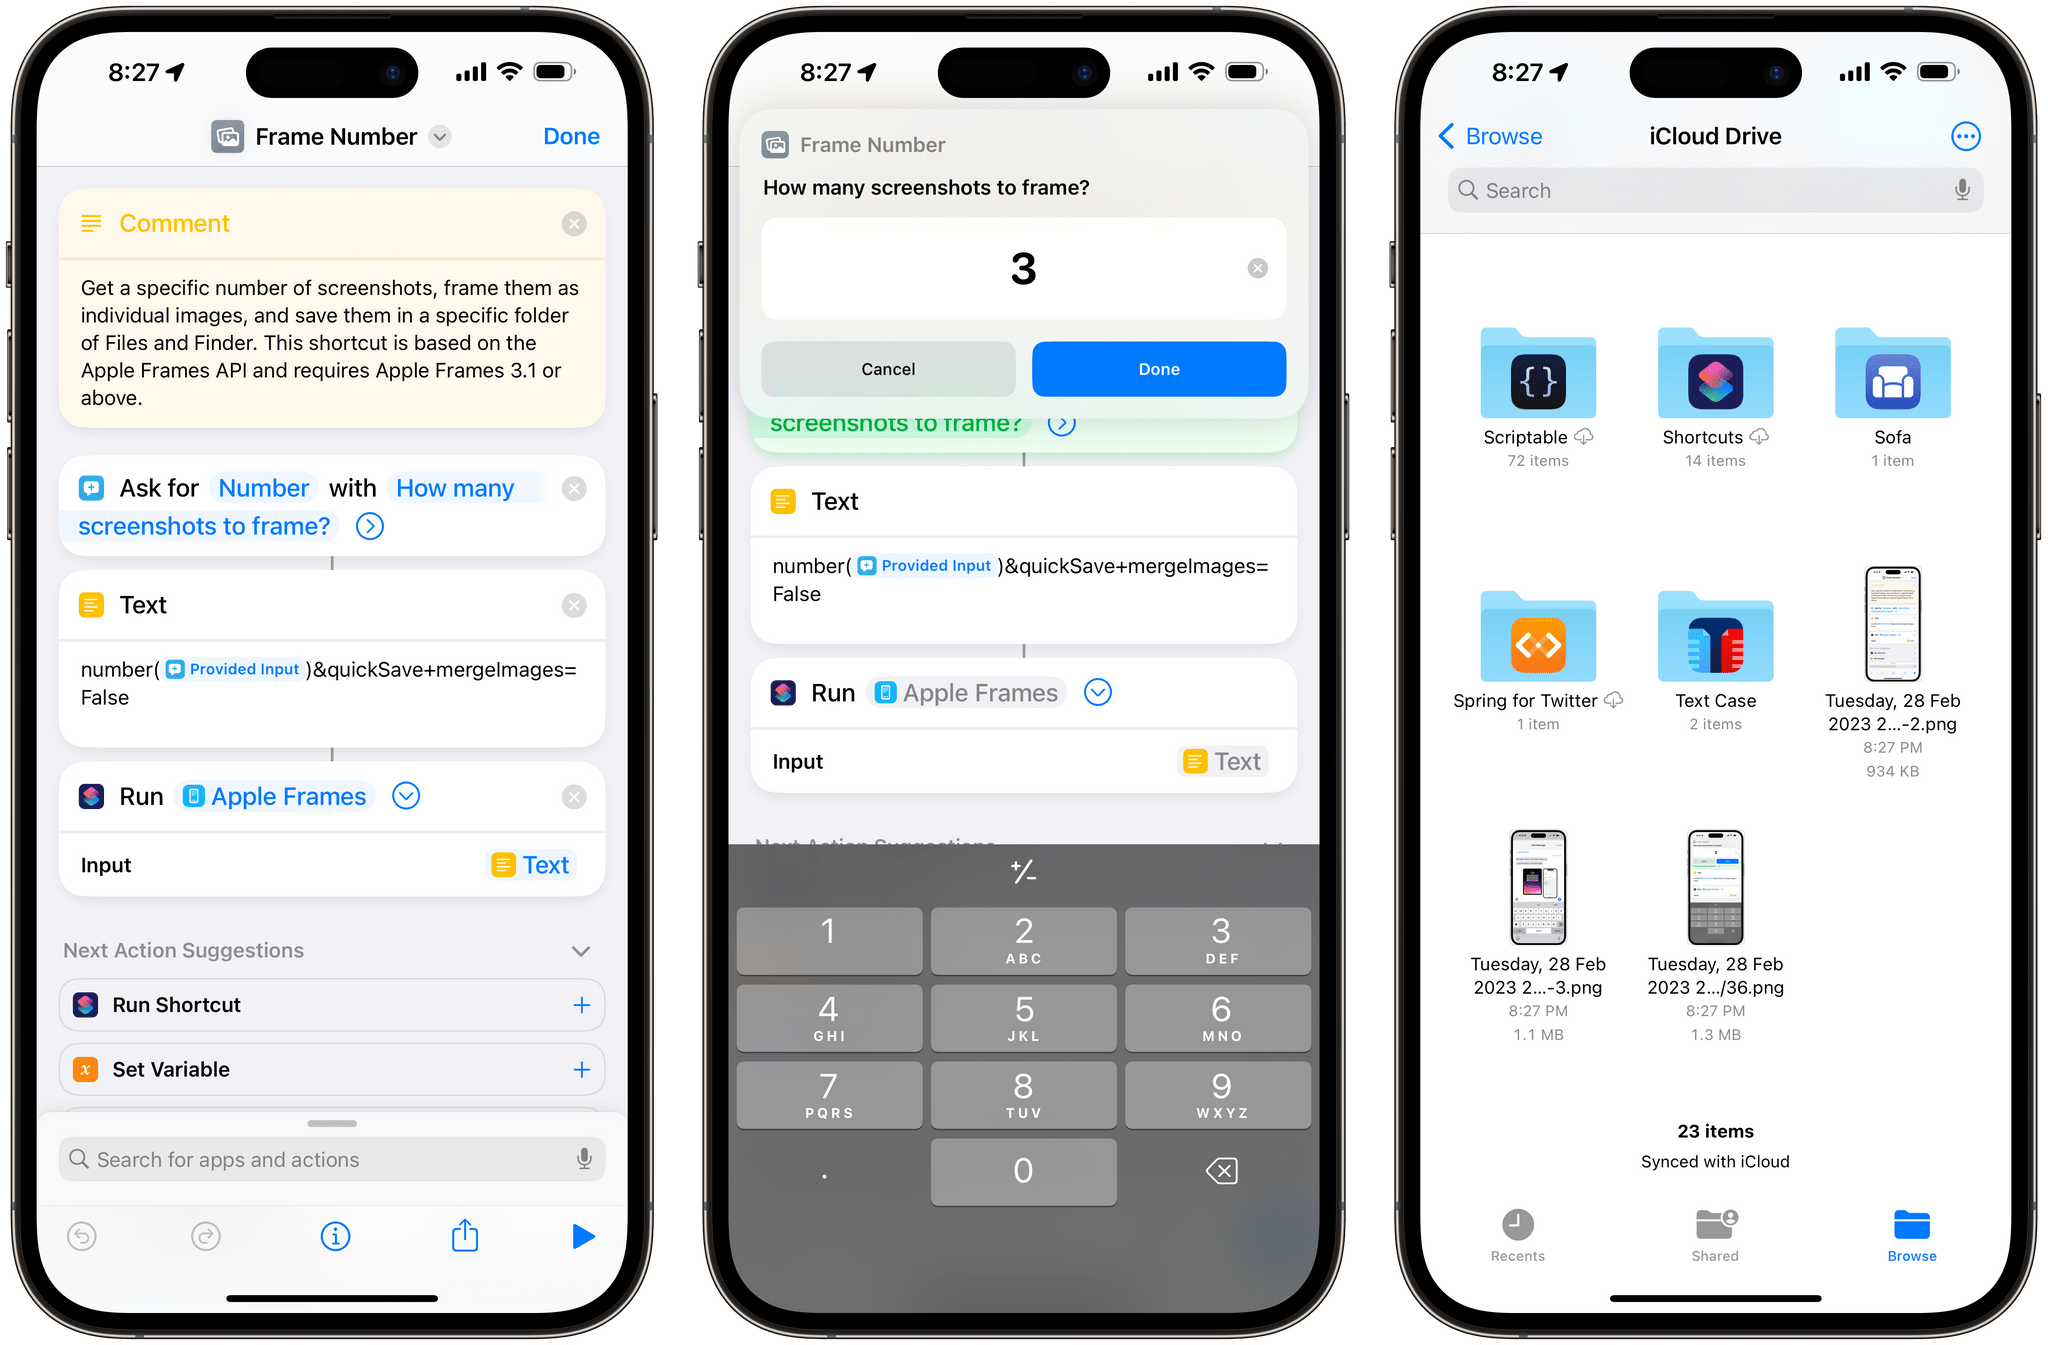
Given a number of recent screenshots, frame them individually, and save them into a folder in Files.
Frame Number
Get a specific number of screenshots, frame them as individual images, and save them in a specific folder of Files and Finder. This shortcut is based on the Apple Frames API and requires Apple Frames 3.1 or above.
The next one is a request I’ve heard multiple times: you have a folder full of screenshots and want to frame them all at once, saving the results to another folder as individual images. With the Frame Folder helper shortcut, you can fetch screenshots from a specific location in Files/Finder, frame them, and save them as standalone, framed images in a different location.
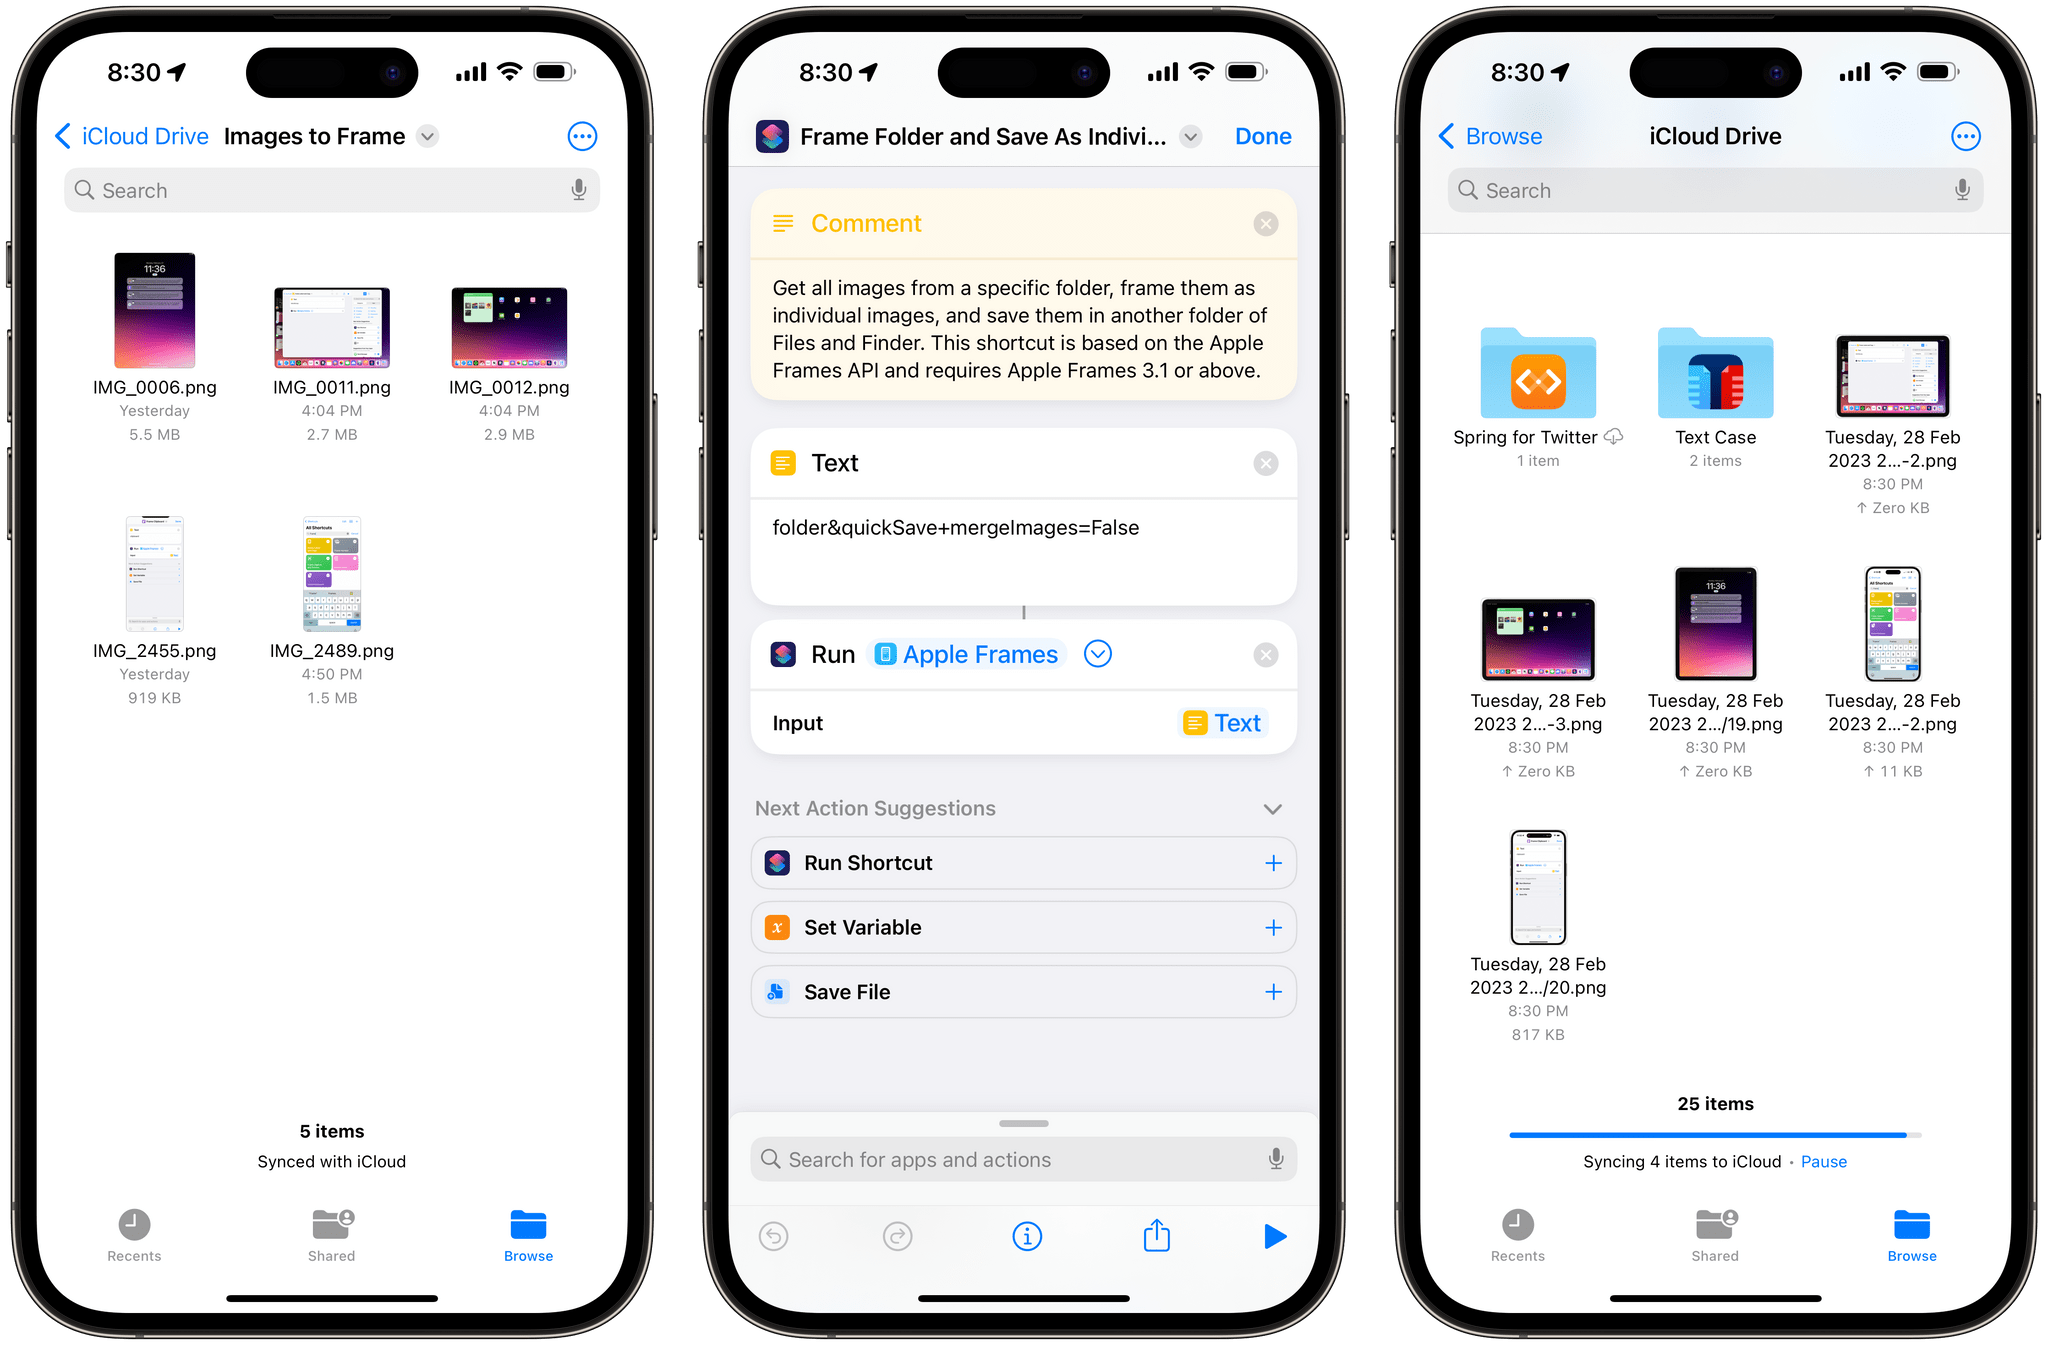
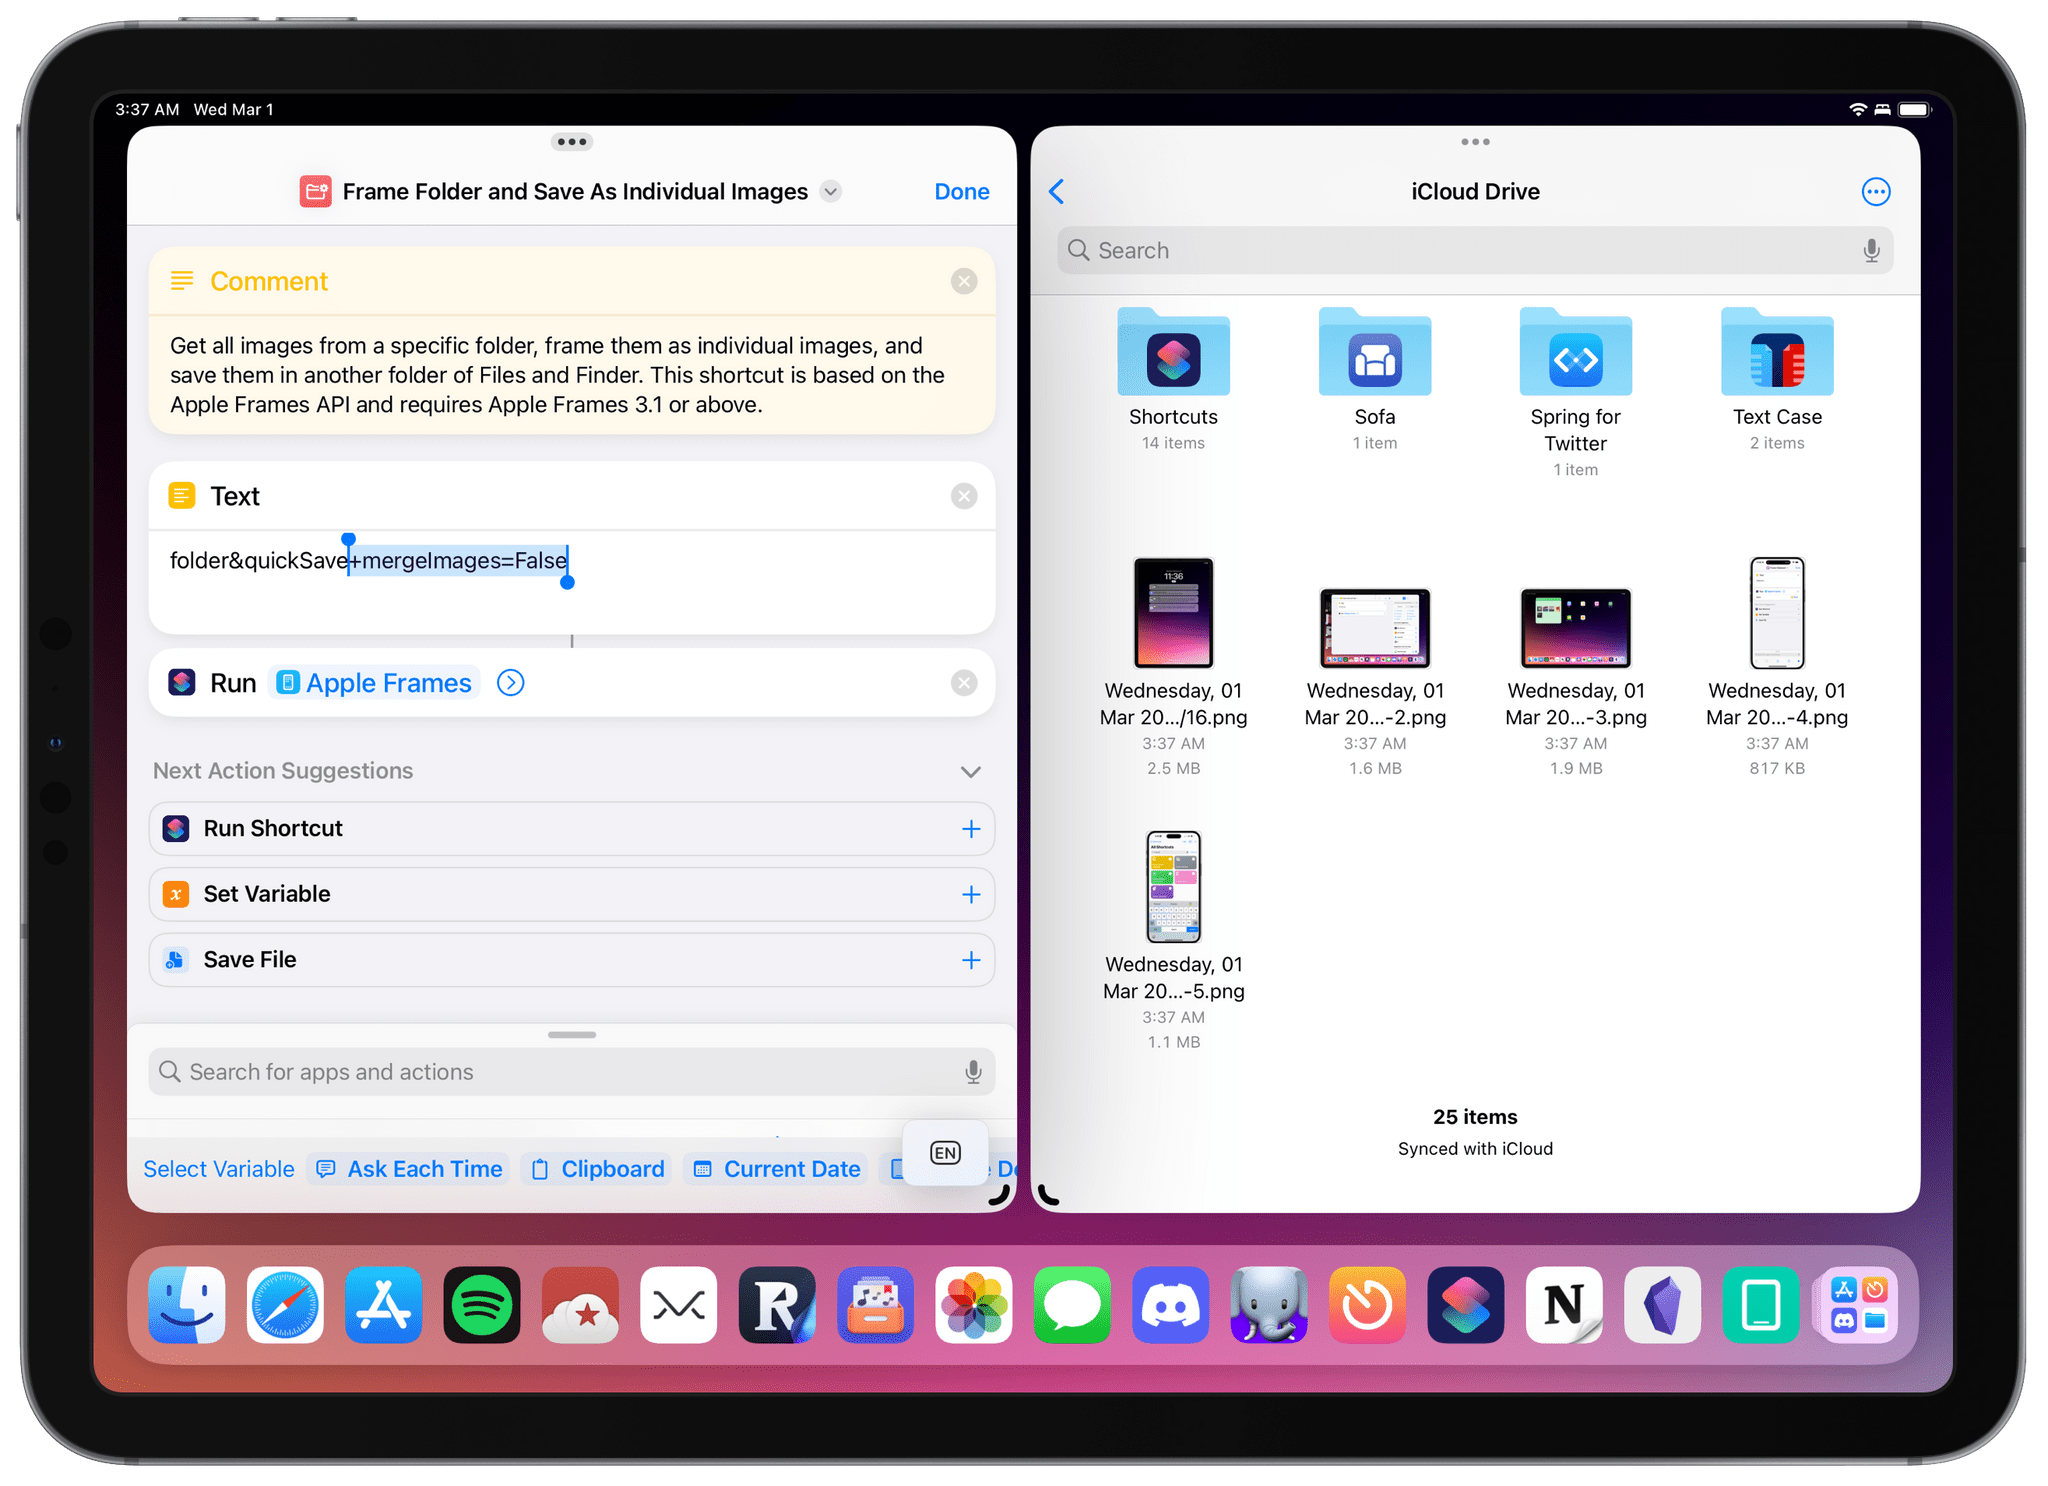
Frame Folder and Save As Individual Images
Get all images from a specific folder, frame them as individual images, and save them in another folder of Files and Finder. This shortcut is based on the Apple Frames API and requires Apple Frames 3.1 or above.
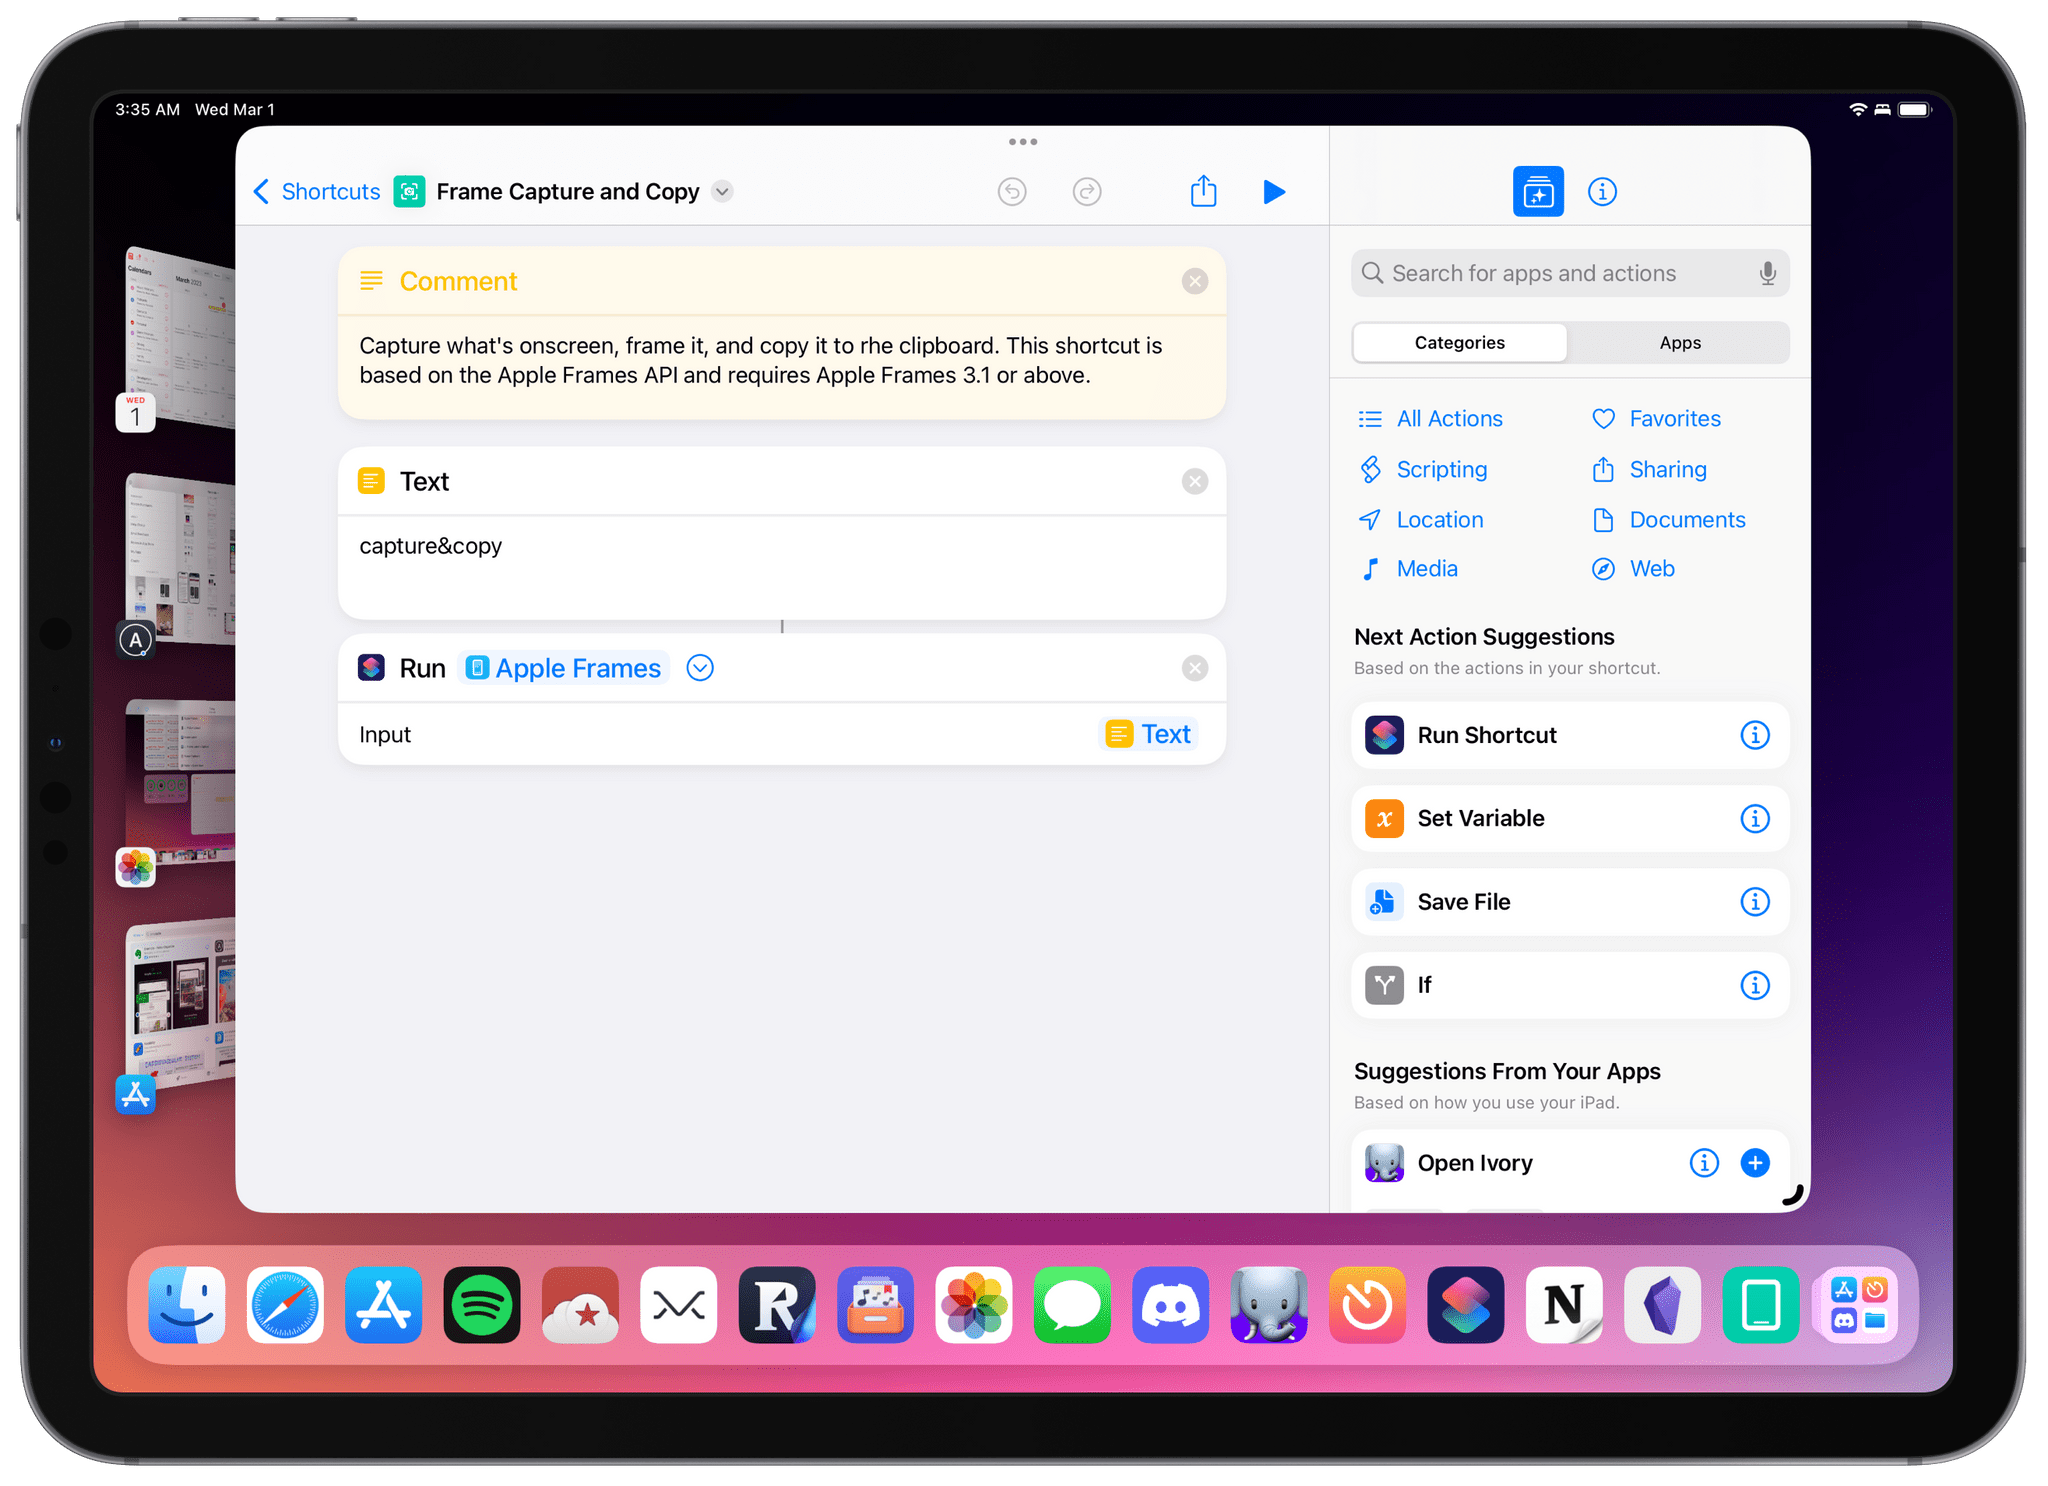
Lastly, let’s say you want to use Apple Frames on macOS and put together a helper shortcut that instantly captures what you’re looking at, frames it, then puts the framed image in your system clipboard. With Frame Capture and Copy, you can do just that. Assign a keyboard shortcut to this helper utility, and you’ll be able to instantly frame whatever you’re looking at on your Mac with a single keystroke.
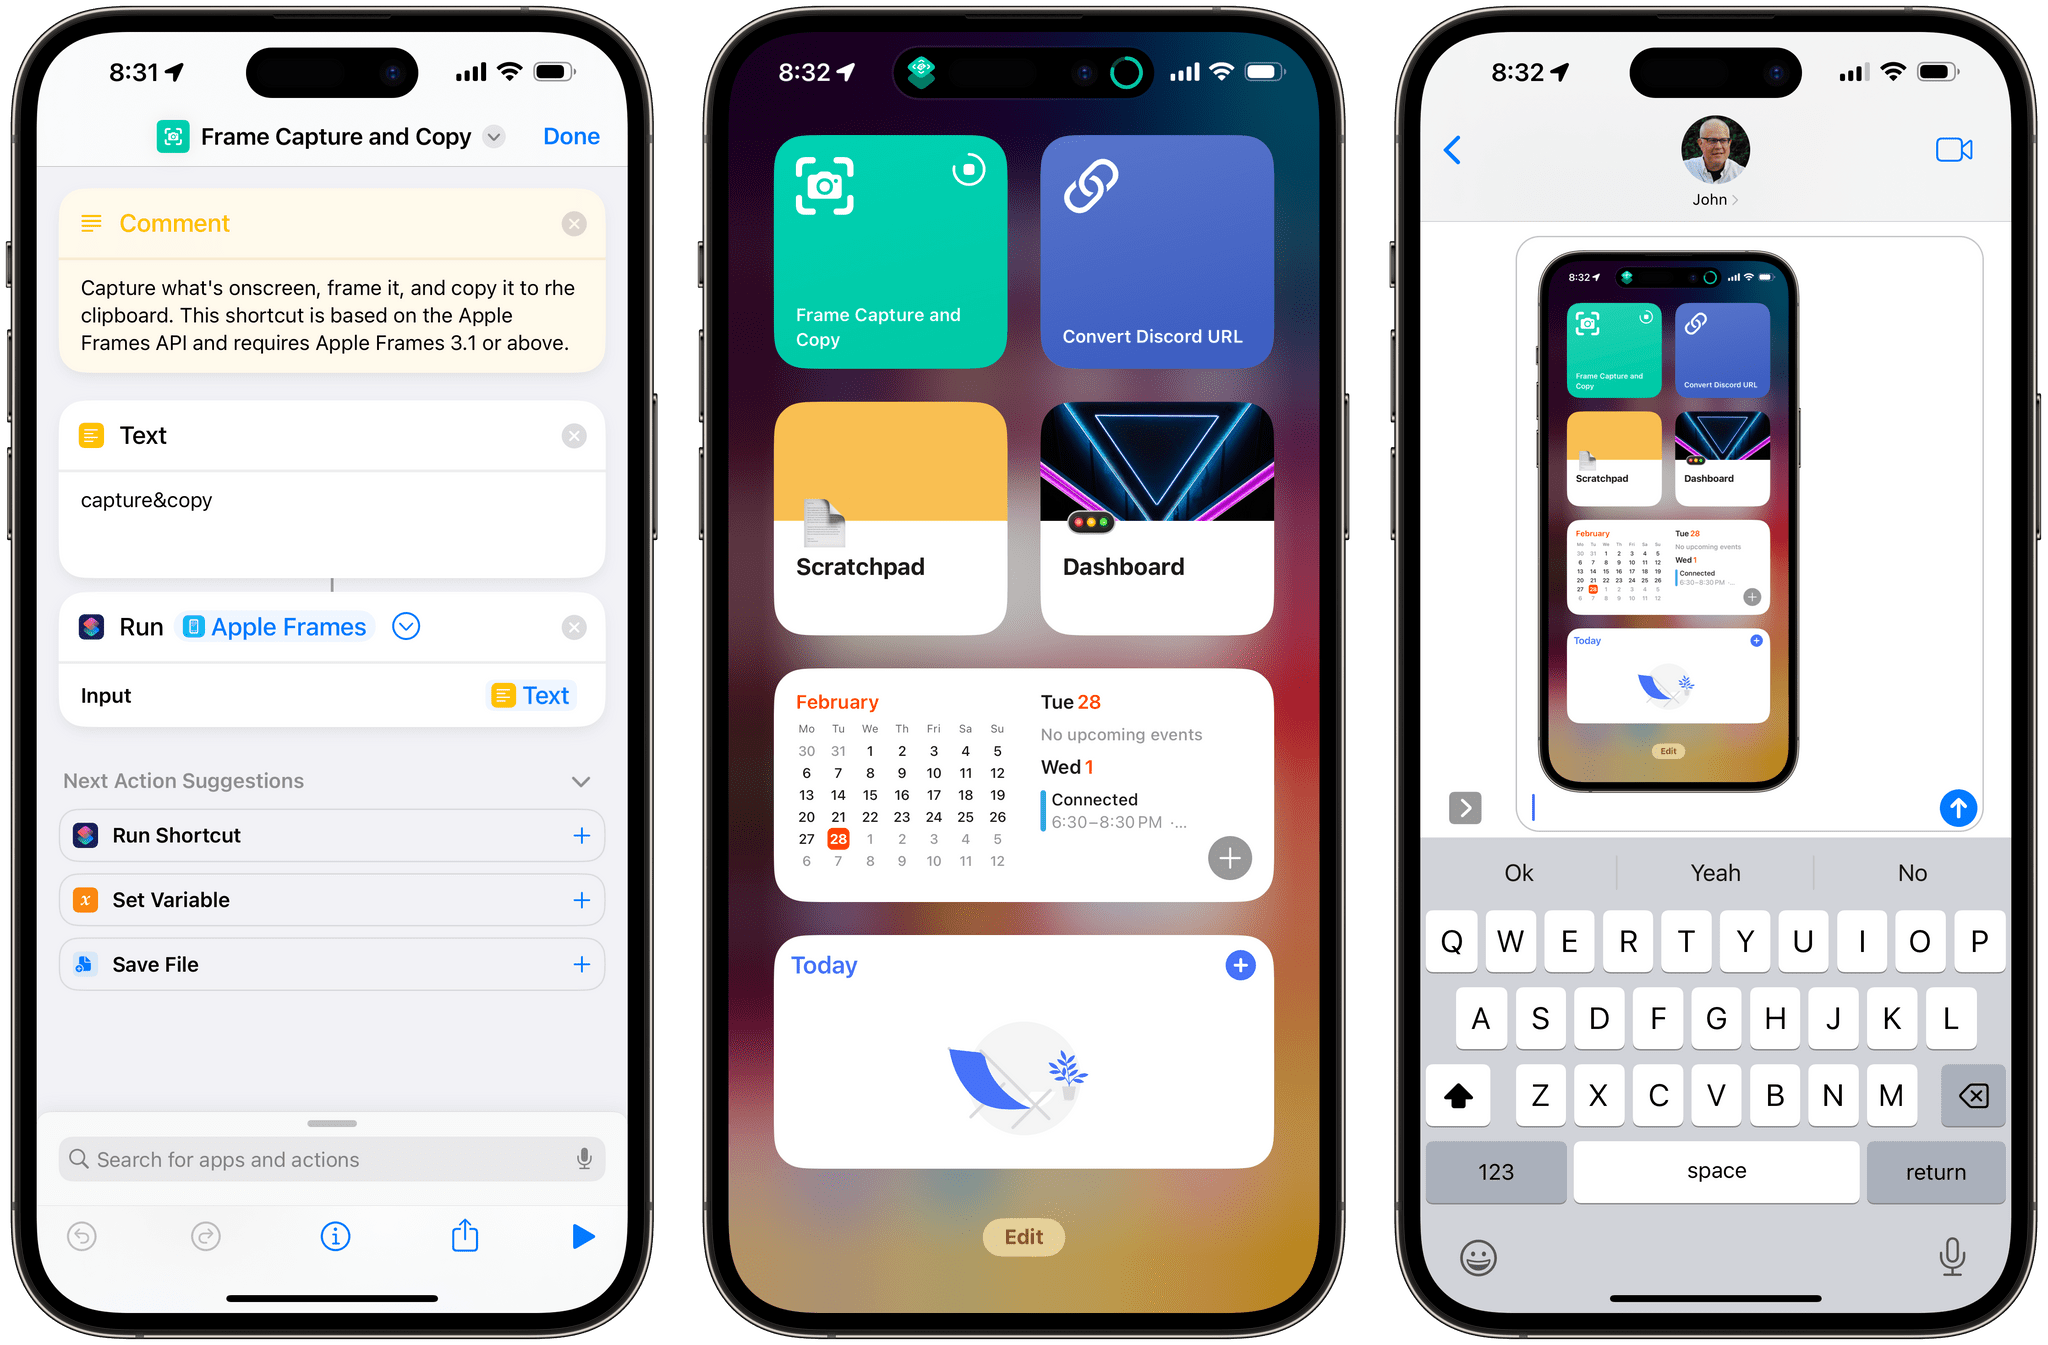
Frame Capture and Copy
Capture what’s onscreen, frame it, and copy it to rhe clipboard. This shortcut is based on the Apple Frames API and requires Apple Frames 3.1 or above.
By creating helper shortcuts based on the ‘Text’ and ‘Run Shortcuts’ actions, you now have the power to fully automate Apple Frames regardless of whether you’re using an iPhone, iPad, or Mac.
Download Apple Frames 3.1
I’m incredibly excited about the Apple Frames API as a tool to help people save even more time with Apple Frames. You don’t have to use this advanced feature; if you don’t need it, just go ahead and install Apple Frames 3.1 below, and keep using it like you’ve always done. You can entirely ignore what I just described and just enjoy support for more devices and bug fixes.
If you seek more power and flexibility in Apple Frames, however, the barebones API I created will let you control the input and output behavior of the shortcut. My hope is that these new options will help you fit Apple Frames into different and more elaborate workflows, allowing you to generate and share better-looking screenshots with fewer interactions than before.
I had fun creating this new flavor Apple Frames, and I hope you’ll find it as useful as I do. You can download Apple Frames 3.1, with full support for the new Apple Frames API, below.
Apple Frames
Add device frames to screenshots for iPhones (11, 8/SE, and 12-13-14 generations in mini/standard/Plus/Pro Max sizes), iPad Pro (11” and 12.9”, 2018-2022 models), iPad Air (10.9”, 2020-2022 models), iPad mini (2021 model), Apple Watch S4/5/6/7/8/Ultra, iMac (24” model, 2021), MacBook Air (2020-2022 models), and MacBook Pro (2021 models). The shortcut supports portrait and landscape orientations, but does not support Display Zoom; on iPadOS and macOS, the shortcut supports Default and More Space resolutions. If multiple screenshots are passed as input, they will be combined in a single image. The shortcut can be run in the Shortcuts app, as a Home Screen widget, as a Finder Quick Action, or via the share sheet. The shortcut also supports an API for automating input images and framed results.